with user_log as ( select col1 as user_id, col2 as login_date fromvalues (1, '2023-01-01') ,(1, '2023-01-02') ,(1, '2023-01-03') ,(1, '2023-01-04') ,(1, '2023-01-11') ,(1, '2023-01-12') ,(1, '2023-01-15') ,(2, '2023-01-15') ,(3, '2023-01-01') ,(3, '2023-01-02') ,(3, '2023-01-03') ) select*from user_log
场景
场景1 给定具体日期,且指定连续登录天数
例如: 求在2023-01-03号那天连续登录3天的用户。
这种场景是最简单的,直接聚合+having
1 2 3 4 5 6 7
select user_id ,count(*) as cnt from user_log where login_date between date_sub('2023-01-03',2) and'2023-01-03' groupby user_id having cnt>=3 orderby user_id
结果:
user_id
cnt
1
3
1
3
场景2,不给定具体日期,但指定连续登录天数
例如:求用户在哪几天连续登录2天。
这部分需要用到窗口函数了,同时由于日期间隔为1,可以使用range特性
1 2 3 4
select* , count(*) over (partitionby user_id orderby datediff(login_date, '2000-01-01') rangebetween1 preceding andcurrentrow ) as continue_cnt from user_log orderby user_id,login_date
dim_date as ( select t1.* ,date_add('2022-12-31',row_num) as dt_ymd from ( selectrow_number() over(orderby m) as row_num from (select split(repeat(",",15),",") as multi) a LATERALVIEW explode(multi) tmpTable as m ) t1 ) ,user_full_date as ( select t1.user_id ,t2.dt_ymd from (selectdistinct user_id from user_log) t1 crossjoin dim_date t2 ) ,last_unlogin as ( select a.user_id ,a.dt_ymd ,b.user_id as user_id2 ,b.login_date ,last_value(if(b.login_date isnotnull,null,a.dt_ymd),true) over(partitionby a.user_id orderby a.dt_ymd rowsbetween unbounded preceding andcurrentrow ) as last_unlogin_date from user_full_date a leftjoin user_log b on a.dt_ymd=b.login_date and a.user_id=b.user_id ) select user_id ,login_date ,date_diff(login_date,nvl(last_unlogin_date,'2022-12-31')) as continue_days ,last_unlogin_date from last_unlogin where user_id2 isnotnull orderby user_id,dt_ymd
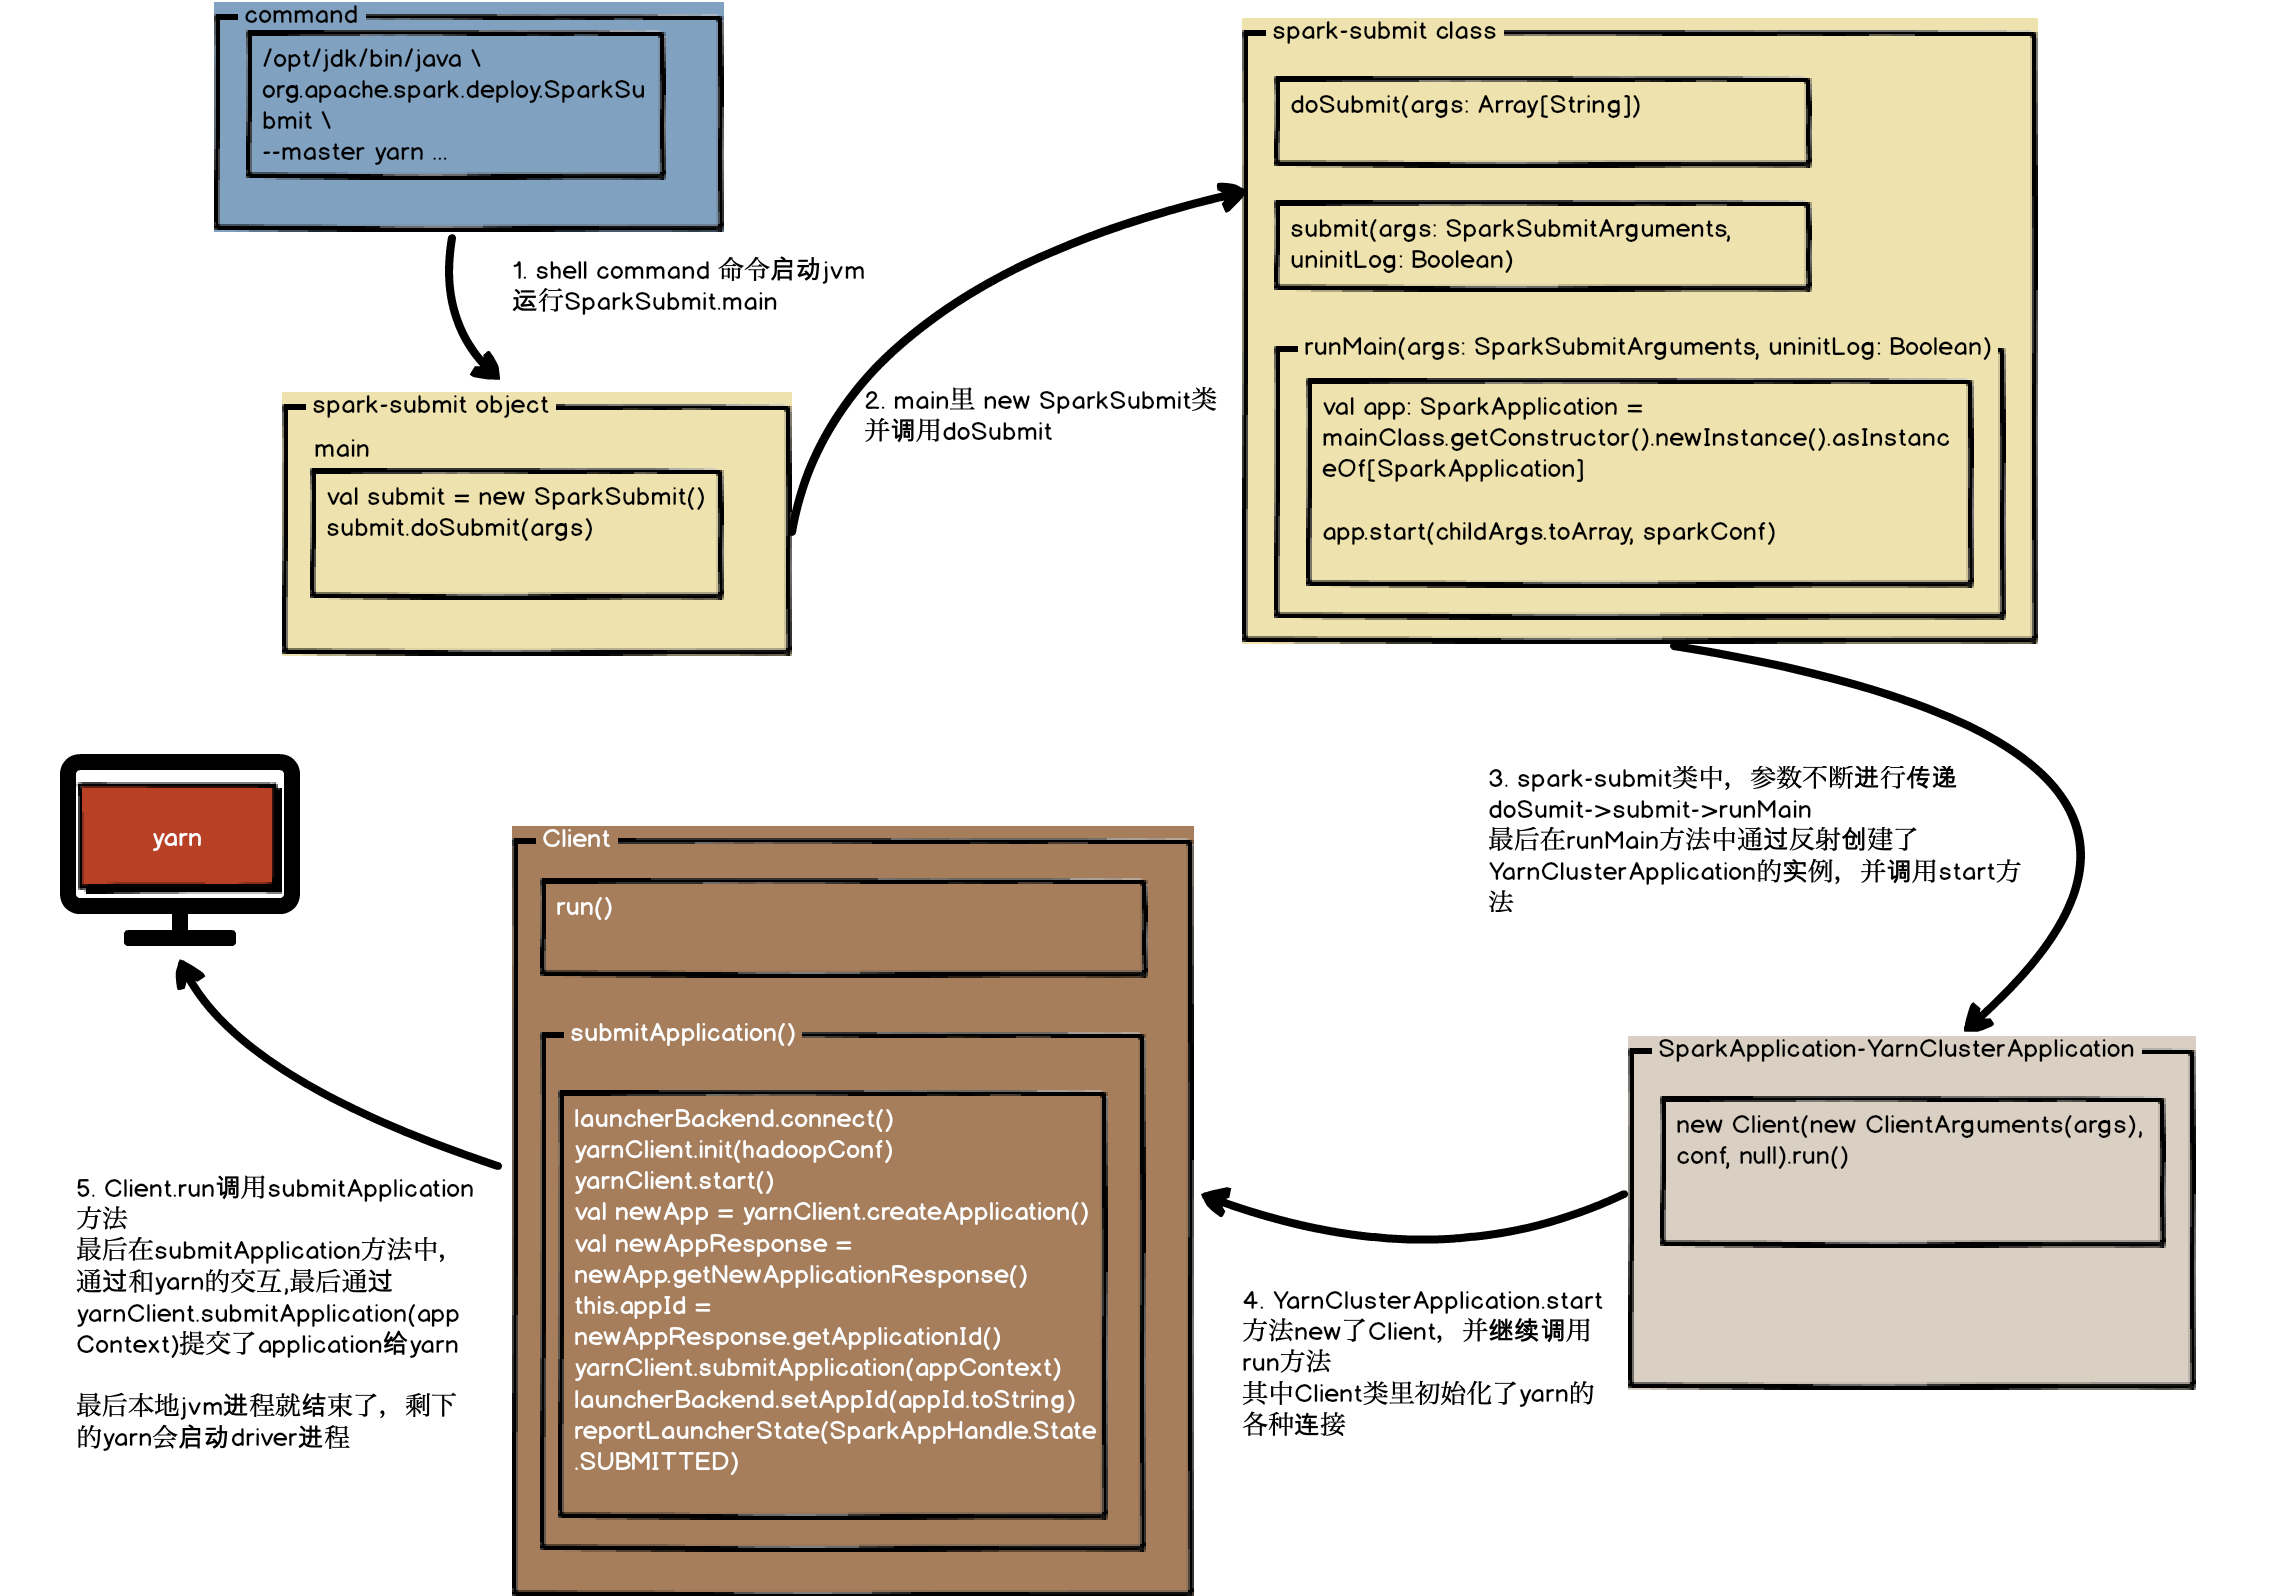
//submit->doRunMain->runMain submit方法中直接调用函数doRunMain,doRunMain判断是否需要代理用户,之后就调用runMain方法 privatedefsubmit(args: SparkSubmitArguments, uninitLog: Boolean): Unit = { defdoRunMain(): Unit = { if (args.proxyUser != null) { ...... } else { runMain(args, uninitLog) } }
// In standalone cluster mode, there are two submission gateways: // (1) The traditional RPC gateway using o.a.s.deploy.Client as a wrapper // (2) The new REST-based gateway introduced in Spark 1.3 // The latter is the default behavior as of Spark 1.3, but Spark submit will fail over // to use the legacy gateway if the master endpoint turns out to be not a REST server. if (args.isStandaloneCluster && args.useRest) { try { logInfo("Running Spark using the REST application submission protocol.") doRunMain() } catch { // Fail over to use the legacy submission gateway case e: SubmitRestConnectionException => logWarning(s"Master endpoint ${args.master} was not a REST server. " + "Falling back to legacy submission gateway instead.") args.useRest = false submit(args, false) } // In all other modes, just run the main class as prepared } else { doRunMain() } }
overridedefstart(args: Array[String], conf: SparkConf): Unit = { // SparkSubmit would use yarn cache to distribute files & jars in yarn mode, // so remove them from sparkConf here for yarn mode. conf.remove(JARS) conf.remove(FILES) conf.remove(ARCHIVES)
if (log.isDebugEnabled) { logDebug("Requesting a new application from cluster with %d NodeManagers" .format(yarnClient.getYarnClusterMetrics.getNumNodeManagers)) }
// Get a new application from our RM val newApp = yarnClient.createApplication() val newAppResponse = newApp.getNewApplicationResponse() this.appId = newAppResponse.getApplicationId()
// The app staging dir based on the STAGING_DIR configuration if configured // otherwise based on the users home directory. // scalastyle:off FileSystemGet val appStagingBaseDir = sparkConf.get(STAGING_DIR) .map { newPath(_, UserGroupInformation.getCurrentUser.getShortUserName) } .getOrElse(FileSystem.get(hadoopConf).getHomeDirectory()) stagingDirPath = newPath(appStagingBaseDir, getAppStagingDir(appId)) // scalastyle:on FileSystemGet
// Verify whether the cluster has enough resources for our AM verifyClusterResources(newAppResponse)
// Set up the appropriate contexts to launch our AM val containerContext = createContainerLaunchContext() val appContext = createApplicationSubmissionContext(newApp, containerContext)
// Finally, submit and monitor the application logInfo(s"Submitting application $appId to ResourceManager") yarnClient.submitApplication(appContext) launcherBackend.setAppId(appId.toString) reportLauncherState(SparkAppHandle.State.SUBMITTED) } catch { case e: Throwable => if (stagingDirPath != null) { cleanupStagingDir() } throw e } }
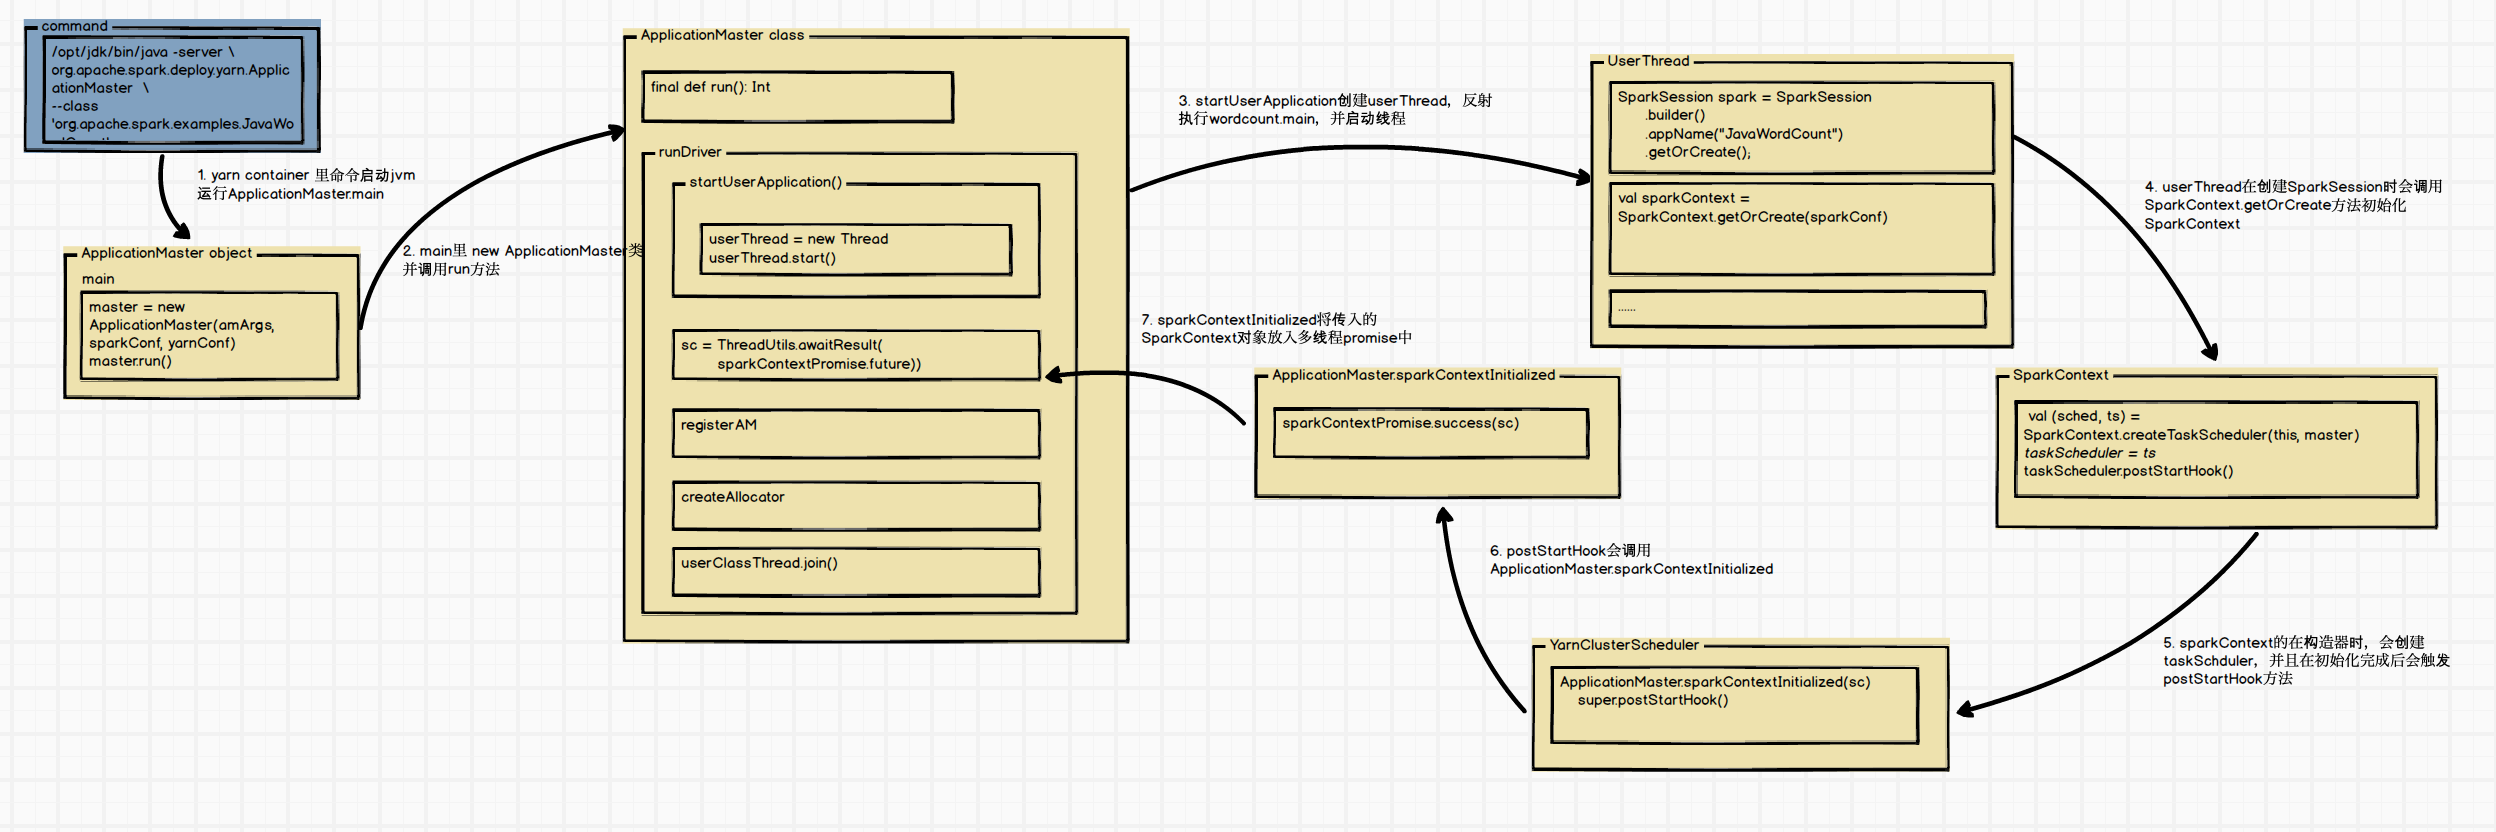
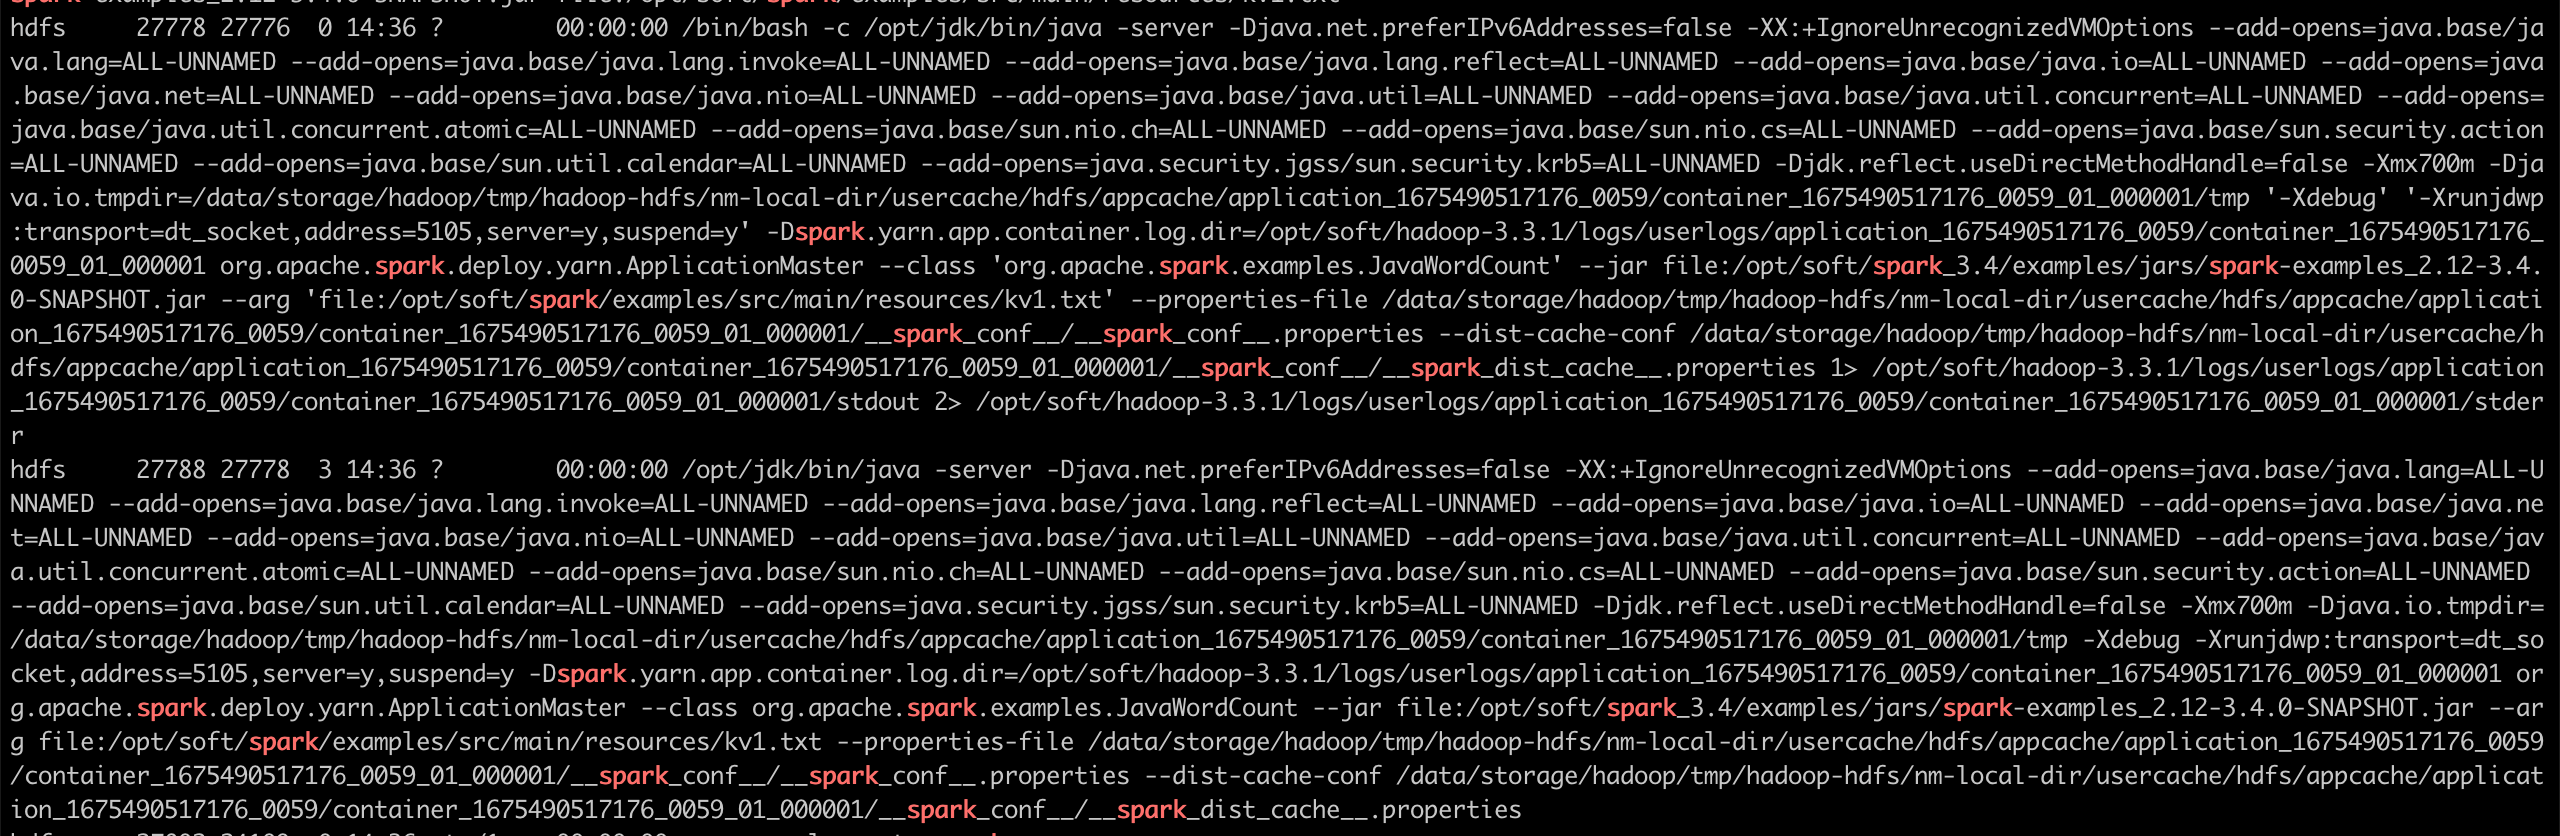
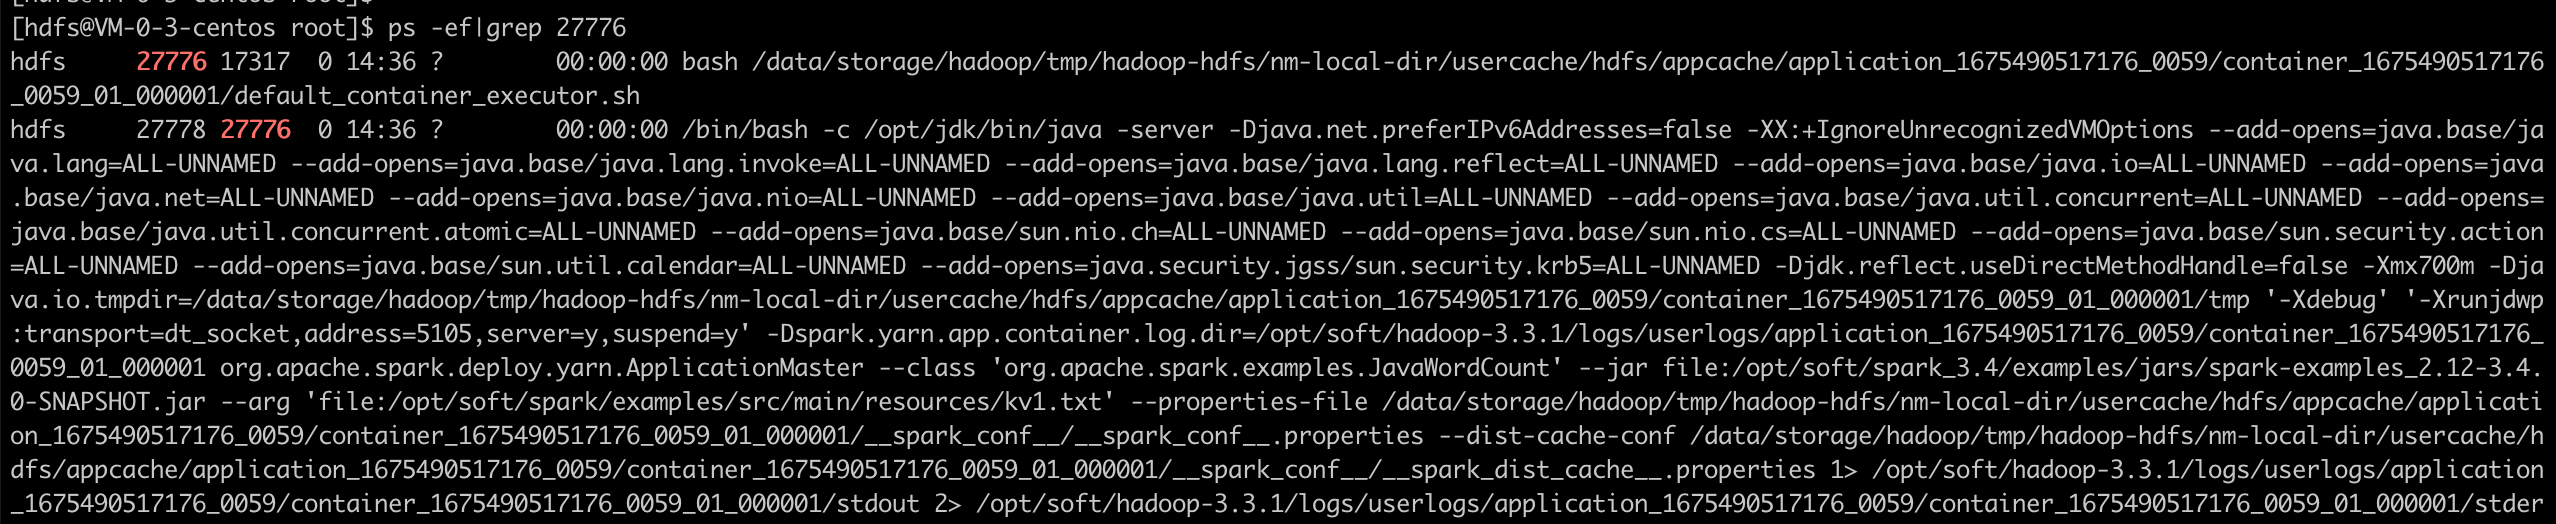
6. 至此,本地jvm进程就结束了,剩下的yarn会启动driver进程
其他补充
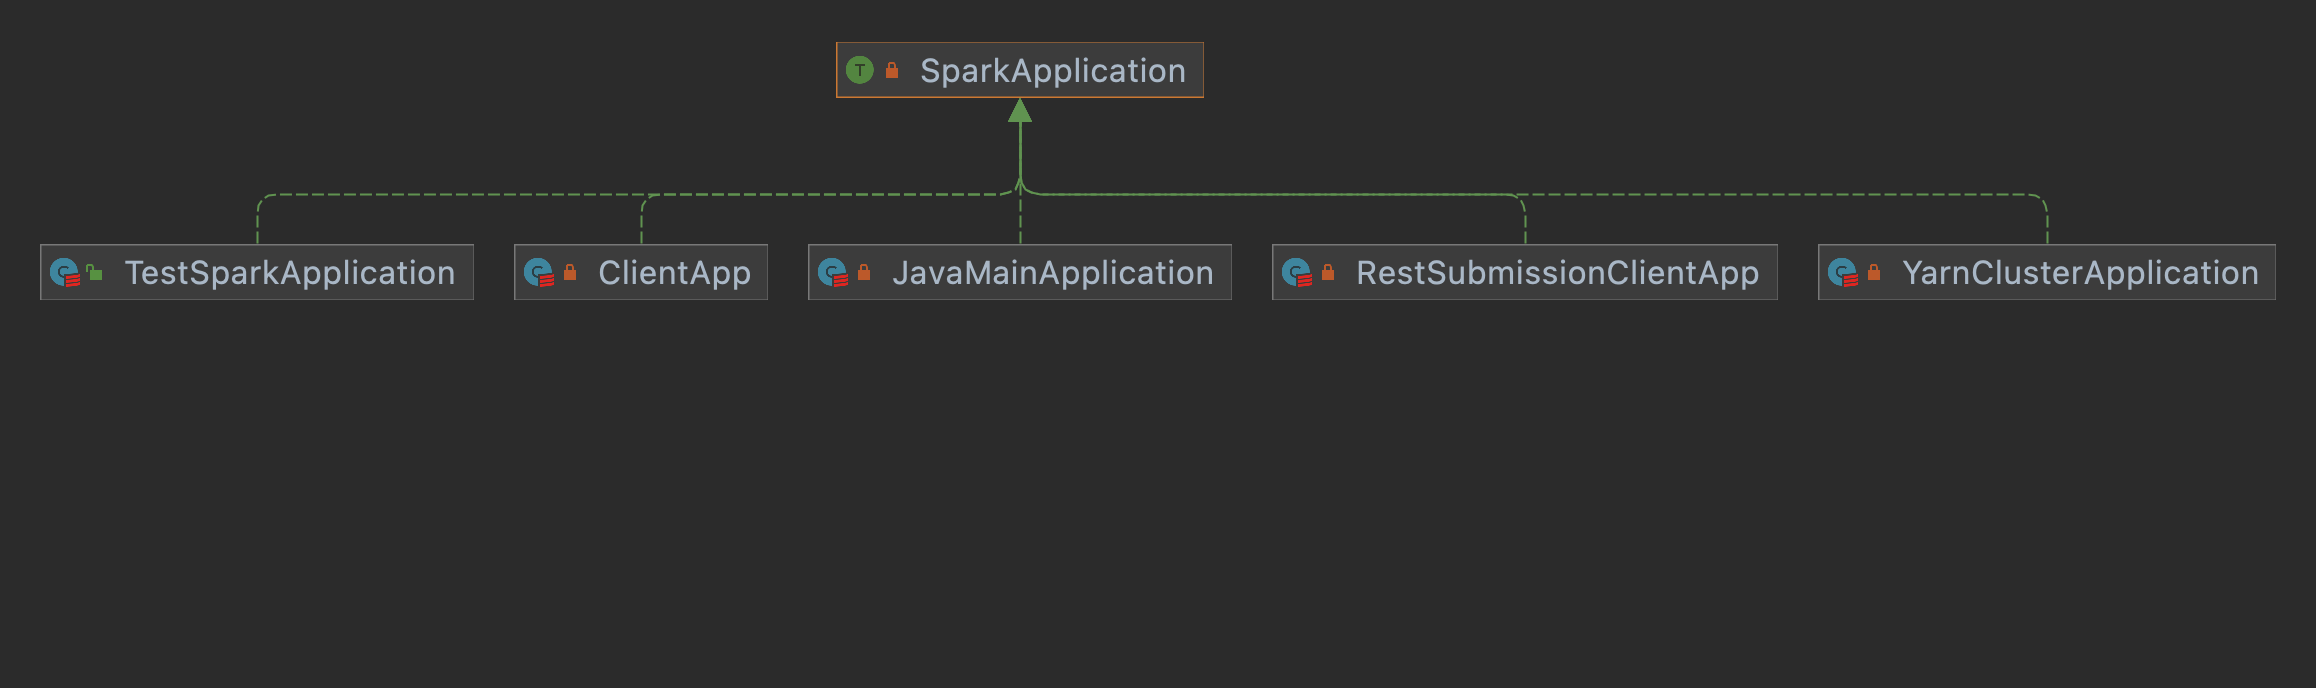
SparkApplication
1 2 3 4 5 6 7 8
/** * Entry point for a Spark application. Implementations must provide a no-argument constructor. */ private[spark] traitSparkApplication{
defstart(args: Array[String], conf: SparkConf): Unit
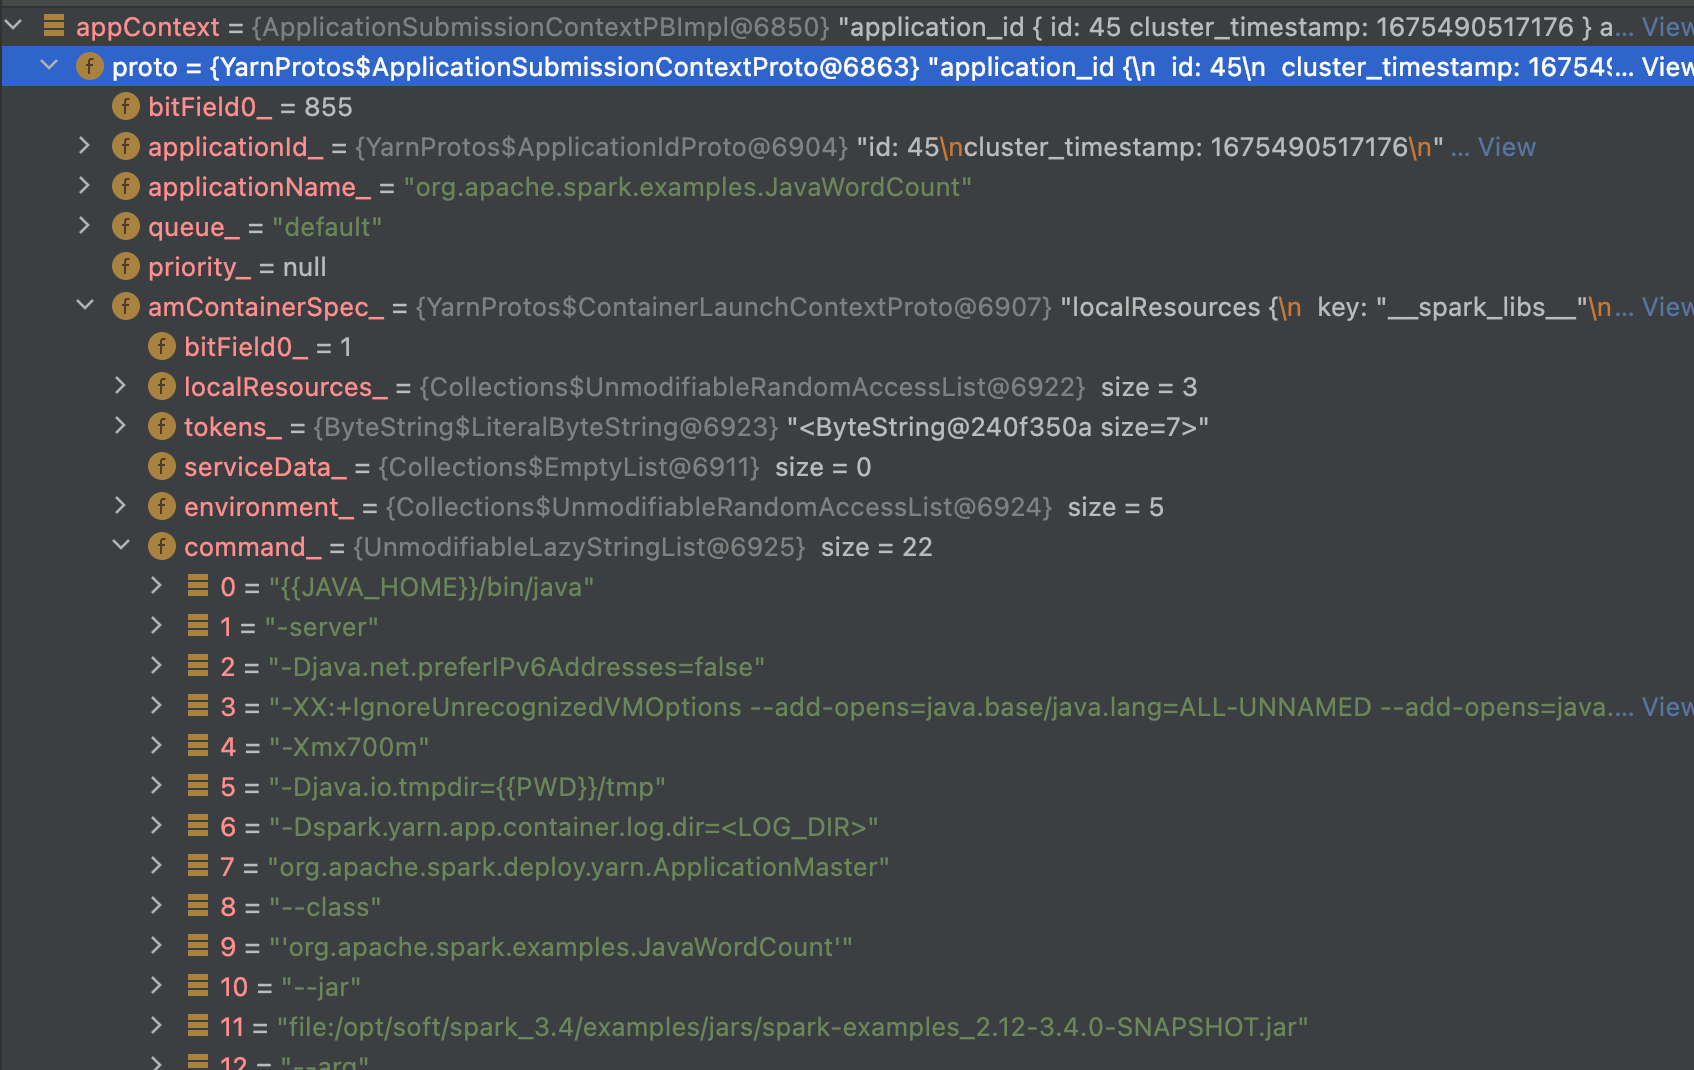
defsubmitApplication(): Unit = { ResourceRequestHelper.validateResources(sparkConf) ...... try { // Set up the appropriate contexts to launch our AM val containerContext = createContainerLaunchContext() val appContext = createApplicationSubmissionContext(newApp, containerContext) ...... } ..... }
//根据amArgs参数拼装最后执行的命令 // Command for the ApplicationMaster val commands = prefixEnv ++ Seq(Environment.JAVA_HOME.$$() + "/bin/java", "-server") ++ javaOpts ++ amArgs ++ Seq( "1>", ApplicationConstants.LOG_DIR_EXPANSION_VAR + "/stdout", "2>", ApplicationConstants.LOG_DIR_EXPANSION_VAR + "/stderr")
// TODO: it would be nicer to just make sure there are no null commands here val printableCommands = commands.map(s => if (s == null) "null"else s).toList //将命令传递给amContainer并返回。 amContainer.setCommands(printableCommands.asJava) ...... }
最后,通过
1
val appContext = createApplicationSubmissionContext(newApp, containerContext)
privatedefrunDriver(): Unit = { ...... //启动用户的application线程,即JavaWordCount的main类 userClassThread = startUserApplication()
// This a bit hacky, but we need to wait until the spark.driver.port property has // been set by the Thread executing the user class. logInfo("Waiting for spark context initialization...") ...... try { val sc = ThreadUtils.awaitResult(sparkContextPromise.future, Duration(totalWaitTime, TimeUnit.MILLISECONDS)) if (sc != null) { ...... registerAM(host, port, userConf, sc.ui.map(_.webUrl), appAttemptId) ...... createAllocator(driverRef, userConf, rpcEnv, appAttemptId, distCacheConf) } else { ...... } resumeDriver() userClassThread.join() } catch { ...... } finally { resumeDriver() } }
defgetOrCreate(): SparkSession = synchronized { ...... // Global synchronization so we will only set the default session once. SparkSession.synchronized { ...... val sparkContext = userSuppliedContext.getOrElse { ...... SparkContext.getOrCreate(sparkConf) // Do not update `SparkConf` for existing `SparkContext`, as it's shared by all sessions. } ...... }
return session } }
8. SparkContext.getOrCreate
该方法比较简单,主要用于获取或实例化 SparkContext ,并将其注册为单例对象。
1 2 3 4 5 6 7 8 9 10 11 12 13 14
defgetOrCreate(config: SparkConf): SparkContext = { // Synchronize to ensure that multiple create requests don't trigger an exception // from assertNoOtherContextIsRunning within setActiveContext SPARK_CONTEXT_CONSTRUCTOR_LOCK.synchronized { if (activeContext.get() == null) { setActiveContext(newSparkContext(config)) } else { if (config.getAll.nonEmpty) { logWarning("Using an existing SparkContext; some configuration may not take effect.") } } activeContext.get() } }
privatedefsparkContextInitialized(sc: SparkContext) = { sparkContextPromise.synchronized { // Notify runDriver function that SparkContext is available sparkContextPromise.success(sc) // Pause the user class thread in order to make proper initialization in runDriver function. sparkContextPromise.wait() } }
privatedefcreateAllocator( driverRef: RpcEndpointRef, _sparkConf: SparkConf, rpcEnv: RpcEnv, appAttemptId: ApplicationAttemptId, distCacheConf: SparkConf): Unit = { ..... val appId = appAttemptId.getApplicationId().toString() val driverUrl = RpcEndpointAddress(driverRef.address.host, driverRef.address.port, CoarseGrainedSchedulerBackend.ENDPOINT_NAME).toString val localResources = prepareLocalResources(distCacheConf)
// Before we initialize the allocator, let's log the information about how executors will // be run up front, to avoid printing this out for every single executor being launched. // Use placeholders for information that changes such as executor IDs. logInfo { val executorMemory = _sparkConf.get(EXECUTOR_MEMORY).toInt val executorCores = _sparkConf.get(EXECUTOR_CORES) val dummyRunner = newExecutorRunnable(None, yarnConf, _sparkConf, driverUrl, "<executorId>", "<hostname>", executorMemory, executorCores, appId, securityMgr, localResources, ResourceProfile.DEFAULT_RESOURCE_PROFILE_ID) dummyRunner.launchContextDebugInfo() }
// Initialize the AM endpoint *after* the allocator has been initialized. This ensures // that when the driver sends an initial executor request (e.g. after an AM restart), // the allocator is ready to service requests. rpcEnv.setupEndpoint("YarnAM", newAMEndpoint(rpcEnv, driverRef))
allocator.allocateResources() val ms = MetricsSystem.createMetricsSystem(MetricsSystemInstances.APPLICATION_MASTER, sparkConf) val prefix = _sparkConf.get(YARN_METRICS_NAMESPACE).getOrElse(appId) ms.registerSource(newApplicationMasterSource(prefix, allocator)) // do not register static sources in this case as per SPARK-25277 ms.start(false) metricsSystem = Some(ms) reporterThread = launchReporterThread() }
with tmp as ( select'张三'asname,100as score unionall select'张三'asname,80as score ) select * ,lead(score) over w as lead_score from tmp window w as (partitionbynameorderby score) orderby score
此时结果为
name
score
lead_score
张三
80
100
张三
100
null
有什么作用?
当我们同一个窗口,要取的字段比较多时,窗口的partition by xx order by xxx就会重复编写,此时,如要要修改窗口,那么就会要改很多地方,而使用别名,则只需修改一个地方,同时,代码也会简洁很多。
还是举个例子,比如有如下的订单表
id
用户名
商品
支付时间
购买数量
支付金额
1
张三
奶粉
2023-01-01 13:53:52
2
120
2
张三
尿不湿
2023-01-02 14:14:14
3
200
需求是加上上一次同一个用户购买的商品名称,支付时间,购买金额用于分析比较。
那么,正常的一个sql写法为
1 2 3 4 5 6 7 8 9 10 11
with item_order as ( select1as id,'张三'as name,'奶粉'as item_name,'2023-01-01 13:53:52'as pay_time,2as item_cnt,120as pay_amt unionall select2as id,'张三'as name,'尿不湿'as item_name,'2023-01-02 14:14:14'as pay_time,3as item_cnt,200as pay_amt ) select* ,lag(item_name) over (partitionby name orderby pay_time) as lag_item_name ,lag(pay_time) over (partitionby name orderby pay_time) as lag_pay_time ,lag(pay_amt) over (partitionby name orderby pay_time) as lag_pay_amt from item_order orderby name,pay_time
查看上述sql,会发现写了三次 over (partition by name order by pay_time)
而采用窗口别名复用的方法,sql可以变为如下
1 2 3 4 5 6 7 8 9 10 11 12 13
with item_order as ( select1as id,'张三'as name,'奶粉'as item_name,'2023-01-01 13:53:52'as pay_time,2as item_cnt,120as pay_amt unionall select2as id,'张三'as name,'尿不湿'as item_name,'2023-01-02 14:14:14'as pay_time,3as item_cnt,200as pay_amt ) select* ,lag(item_name) over name_window as lag_item_name ,lag(pay_time) over name_window as lag_pay_time ,lag(pay_amt) over name_window as lag_pay_amt from item_order window name_window as (partitionby name orderby pay_time) orderby name,pay_time