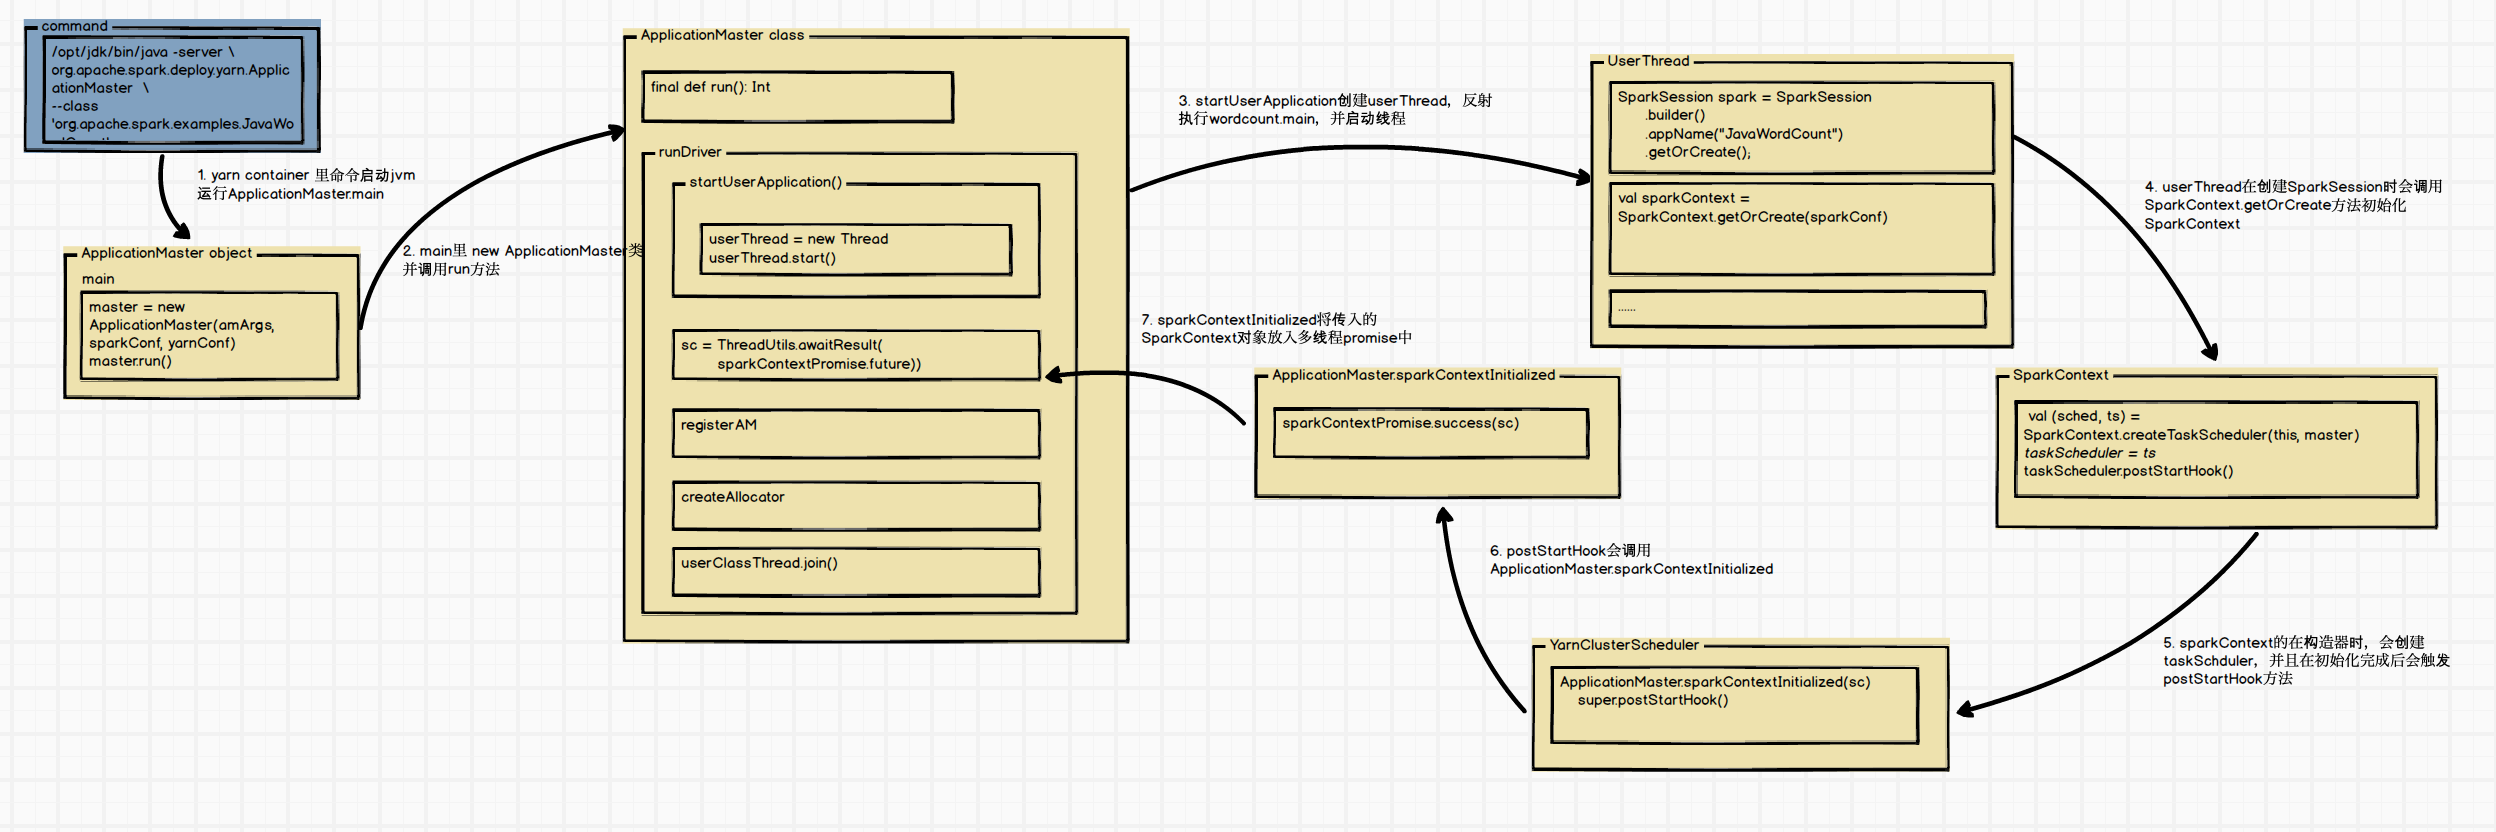
spark源码阅读-spark启动流程 3 driver和executor的启动

引言

在上两篇

终于进入了yarn端

最后拿到的一个命令如下

1
2
3
4
5
6
7
/bin/bash -c /opt/jdk/bin/java -server
-Djava.net.preferIPv6Addresses=false -XX:+IgnoreUnrecognizedVMOptions --add-opens=java.base/java.lang=ALL-UNNAMED --add-opens=java.base/java.lang.invoke=ALL-UNNAMED --add-opens=java.base/java.lang.reflect=ALL-UNNAMED
--add-opens=java.base/java.io=ALL-UNNAMED --add-opens=java.base/java.net=ALL-UNNAMED --add-opens=java.base/java.nio=ALL-UNNAMED --add-opens=java.base/java.util=ALL-UNNAMED --add-opens=java.base/java.util.concurrent=ALL-UNNAMED --add-opens=java.base/java.util.concurrent.atomic=ALL-UNNAMED --add-opens=java.base/sun.nio.ch=ALL-UNNAMED --add-opens=java.base/sun.nio.cs=ALL-UNNAMED --add-opens=java.base/sun.security.action=ALL-UNNAMED --add-opens=java.base/sun.util.calendar=ALL-UNNAMED --add-opens=java.security.jgss/sun.security.krb5=ALL-UNNAMED -Djdk.reflect.useDirectMethodHandle=false -Xmx700m -Djava.io.tmpdir=/data/storage/hadoop/tmp/hadoop-hdfs/nm-local-dir/usercache/hdfs/appcache/application_1675490517176_0054/container_1675490517176_0054_01_000001/tmp -Dspark.yarn.app.container.log.dir=/opt/soft/hadoop-3.3.1/logs/userlogs/application_1675490517176_0054/container_1675490517176_0054_01_000001
org.apache.spark.deploy.yarn.ApplicationMaster
--class 'org.apache.spark.examples.JavaWordCount' --jar file:/opt/soft/spark_3.4/examples/jars/spark-examples_2.12-3.4.0-SNAPSHOT.jar
--arg 'file:/opt/soft/spark/examples/src/main/resources/kv1.txt'
--properties-file /data/storage/hadoop/tmp/hadoop-hdfs/nm-local-dir/usercache/hdfs/appcache/application_1675490517176_0054/container_1675490517176_0054_01_000001/__spark_conf__/__spark_conf__.properties --dist-cache-conf /data/storage/hadoop/tmp/hadoop-hdfs/nm-local-dir/usercache/hdfs/appcache/application_1675490517176_0054/container_1675490517176_0054_01_000001/__spark_conf__/__spark_dist_cache__.properties 1> /opt/soft/hadoop-3.3.1/logs/userlogs/application_1675490517176_0054/container_1675490517176_0054_01_000001/stdout 2> /opt/soft/hadoop-3.3.1/logs/userlogs/application_1675490517176_0054/container_1675490517176_0054_01_000001/stderr

以上便是我们的入口了,本文开始正式了解spark的运行流程。

spark的启动流程

整体概览

先来看一下运行的整体流程,记住一下流程,这就是我们看代码的导航地图。

spark的启动流程分为以下几个步骤

  1. SparkContext 向资源管理器注册并向资源管理器申请运行 Executor
  2. 资源管理器分配 Executor,然后资源管理器启动 Executor
  3. Executor 发送心跳至资源管理器
  4. SparkContext 构建 DAG 有向无环图
  5. 将 DAG 分解成 Stage(TaskSet)
  6. 把 Stage 发送给 TaskScheduler
  7. Executor 向 SparkContext 申请 Task
  8. TaskScheduler 将 Task 发送给 Executor 运行
  9. 同时 SparkContext 将应用程序代码发放给 Executor
  10. Task 在 Executor 上运行,运行完毕释放所有资源

Spark Application Master的启动流程

启动流程概览

driver 端debug命令

1
/opt/soft/spark/bin/spark-submit --driver-java-options "-Xdebug -Xrunjdwp:transport=dt_socket,address=5105,server=y,suspend=y" --master yarn --deploy-mode cluster  --num-executors 1 --executor-memory 800M --driver-memory 700M --executor-cores 2  --class org.apache.spark.examples.JavaWordCount  /opt/soft/spark/examples/jars/spark-examples_2.12-3.4.0-SNAPSHOT.jar file:/opt/soft/spark/examples/src/main/resources/kv1.txt

启动流程详细过程

1. yarn container 里命令启动jvm 运行ApplicationMaster.main

在上文spark源码阅读-spark启动流程 2 spark-submit 代码端执行情况一文中,最终在yarn端container启动的主要命令为:

1
2
3
4
bash -c /opt/jdk/bin/java -server
org.apache.spark.deploy.yarn.ApplicationMaster
--class 'org.apache.spark.examples.JavaWordCount'
--jar file:/opt/soft/spark_3.4/examples/jars/spark-examples_2.12-3.4.0-SNAPSHOT.jar

所以入口还是shell命令,该shell 命令为container内创建,使用java启动了一个jvm,jvm的入口为org.apache.spark.deploy.yarn.ApplicationMaster 这个类的main。

此时查看spark相关的进程,主要有两个。

进程号为27778的进程为yarn container启动的shell,该命令使用bash -c 启动了一个子进程,子进程运行真正的程序,即进程号为27788的程序。

查看27778的父进程,可以看到进程号为27776的进程,该进程为default_container_executor.sh

即我们像yarn提交的application 程序,yarn在其中一个container中已shell的命令进行运行。

2. main里 new ApplicationMaster类并调用run方法

ApplicationMaster的main方法比较简单,主要就是new了一个ApplicationMaster类,并调用run方法

1
2
3
4
5
6
7
8
9
def main(args: Array[String]): Unit = {
......
master = new ApplicationMaster(amArgs, sparkConf, yarnConf)
......
ugi.doAs(new PrivilegedExceptionAction[Unit]() {
override def run(): Unit = System.exit(master.run())
})
}

3. ApplicationMaster的运行

run

调用run方法,该函数为applicationMaster运行的主流程。其代码比较长,但去除一些配置,上下文装配外,其主流程比较简单,根据模式,决定是runDriver还是runExecutorLauncher,本人的路径为runDriver

1
2
3
4
5
6
7
8
9
10
11
12
13
14
15
final def run(): Int = {
try {
......
if (isClusterMode) {
runDriver()
} else {
runExecutorLauncher()
}
} catch {
......
} finally {
......
}
exitCode
}

4. runDriver

runDriver的源码如下,启动了一个线程运行我们的spark主程序,即提交的JavaWordCount的main类。

之后等待userClassThread初始化完成spark context,并设置相关的环境变量,完成后,

  • 通过registerAm注册applicationMaster
  • 通过createAllocator启动executor
  • 通过userClassThread.join()等待userClassThread运行完成,之后退出程序。
    1
    2
    3
    4
    5
    6
    7
    8
    9
    10
    11
    12
    13
    14
    15
    16
    17
    18
    19
    20
    21
    22
    23
    24
    25
    26
    27
    28
    private def runDriver(): Unit = {
    ......
    //启动用户的application线程,即JavaWordCount的main类
    userClassThread = startUserApplication()

    // This a bit hacky, but we need to wait until the spark.driver.port property has
    // been set by the Thread executing the user class.
    logInfo("Waiting for spark context initialization...")
    ......
    try {
    val sc = ThreadUtils.awaitResult(sparkContextPromise.future,
    Duration(totalWaitTime, TimeUnit.MILLISECONDS))
    if (sc != null) {
    ......
    registerAM(host, port, userConf, sc.ui.map(_.webUrl), appAttemptId)
    ......
    createAllocator(driverRef, userConf, rpcEnv, appAttemptId, distCacheConf)
    } else {
    ......
    }
    resumeDriver()
    userClassThread.join()
    } catch {
    ......
    } finally {
    resumeDriver()
    }
    }

5. startUserApplication

startUserApplication 的源码如下,比较简单,就创建了一个线程并启动,该线程通过反射执行我们传入的class,即JavaWordCount

1
2
3
4
5
6
7
8
9
10
11
12
13
14
15
16
17
18
19
20
21
22
23
24
25
26
27
28
29
private def startUserApplication(): Thread = {
......
val mainMethod = userClassLoader.loadClass(args.userClass)
.getMethod("main", classOf[Array[String]])

val userThread = new Thread {
override def run(): Unit = {
try {
if (!Modifier.isStatic(mainMethod.getModifiers)) {
logError(s"Could not find static main method in object ${args.userClass}")
finish(FinalApplicationStatus.FAILED, ApplicationMaster.EXIT_EXCEPTION_USER_CLASS)
} else {
mainMethod.invoke(null, userArgs.toArray)
finish(FinalApplicationStatus.SUCCEEDED, ApplicationMaster.EXIT_SUCCESS)
logDebug("Done running user class")
}
} catch {
.....
} finally {
......
}
}
}
userThread.setContextClassLoader(userClassLoader)
userThread.setName("Driver")
userThread.start()
userThread
}

6.userThtread: JavaWordCount.main

初始化的核心就是这段创建SparkSession,在getOrCreate方法中会创建sparkContext

1
2
3
4
SparkSession spark = SparkSession
.builder()
.appName("JavaWordCount")
.getOrCreate();

7. sparkSession.getOrCreate

当SparkContext未初始化时,通过SparkContext.getOrCreate获取。

1
2
3
4
5
6
7
8
9
10
11
12
13
14
15
16
  def getOrCreate(): SparkSession = synchronized {
......
// Global synchronization so we will only set the default session once.
SparkSession.synchronized {
......
val sparkContext = userSuppliedContext.getOrElse {
......
SparkContext.getOrCreate(sparkConf)
// Do not update `SparkConf` for existing `SparkContext`, as it's shared by all sessions.
}
......
}

return session
}
}

8. SparkContext.getOrCreate

该方法比较简单,主要用于获取或实例化 SparkContext ,并将其注册为单例对象。

1
2
3
4
5
6
7
8
9
10
11
12
13
14
def getOrCreate(config: SparkConf): SparkContext = {
// Synchronize to ensure that multiple create requests don't trigger an exception
// from assertNoOtherContextIsRunning within setActiveContext
SPARK_CONTEXT_CONSTRUCTOR_LOCK.synchronized {
if (activeContext.get() == null) {
setActiveContext(new SparkContext(config))
} else {
if (config.getAll.nonEmpty) {
logWarning("Using an existing SparkContext; some configuration may not take effect.")
}
}
activeContext.get()
}
}

9.new SparkContext(config)

该方法其实为SparkContext的初始化,SparkContext的属性较多,我们只关注启动流程上关注的信息,即设调用了YarnClusterScheduler.postStartHook()

在SparContext.class内部,有一大段代码块,该段代码块会被编译进构造器中,也就是在new class时候会运行,整个方法见识创建了一个YarnClusterScheduler,然后在启动完成后调用postStartHook方法。

1
2
3
4
5
6
// Create and start the scheduler
val (sched, ts) = SparkContext.createTaskScheduler(this, master)
_schedulerBackend = sched
_taskScheduler = ts
// Post init
_taskScheduler.postStartHook()

10 为什么是YarnClusterScheduler.postStartHook()?

还记得上文第四部4-rundriver方法中,启动完userThread后,main线程会等待SparkContext初始化完成,那么如何判断的呢,是通过多线程间的promise和futhur获取的。

1
2
3
4
5
val sc = ThreadUtils.awaitResult(sparkContextPromise.future,
Duration(totalWaitTime, TimeUnit.MILLISECONDS))
if (sc != null) {
......
}

而sparkContextPromise的对象放入是通过什么方法呢,是sparkContextInitialized

1
2
3
4
5
6
7
8
private def sparkContextInitialized(sc: SparkContext) = {
sparkContextPromise.synchronized {
// Notify runDriver function that SparkContext is available
sparkContextPromise.success(sc)
// Pause the user class thread in order to make proper initialization in runDriver function.
sparkContextPromise.wait()
}
}

而sparkContextInitialized又被ApplicationMaster.sparkContextInitialized这个静态方法调用。

1
2
3
private[spark] def sparkContextInitialized(sc: SparkContext): Unit = {
master.sparkContextInitialized(sc)
}

而ApplicationMaster.sparkContextInitialized又被YarnClusterScheduler类中的postStartHook方法调用,YarnClusterScheduler继承自YarnScheule基础自TaskScheuleImpl,本质上就是任务调度暴露了hook接口,方便后续使用。

1
2
3
4
5
override def postStartHook(): Unit = {
ApplicationMaster.sparkContextInitialized(sc)
super.postStartHook()
logInfo("YarnClusterScheduler.postStartHook done")
}

所有,整体流程就是userThread在完成SparkContext的初始化后,告知schedule启动完成,schedule将告知ApplicationMaster启动完成,ApplicationMaster接受后,继续之前阻塞的程序。

11.registerAM

这一步就是注册applicationMaster,其实也是driver了,很简单,直接调用client.register

1
2
3
4
5
6
7
8
9
10
11
12
13
14
private def registerAM(
host: String,
port: Int,
_sparkConf: SparkConf,
uiAddress: Option[String],
appAttempt: ApplicationAttemptId): Unit = {
val appId = appAttempt.getApplicationId().toString()
val attemptId = appAttempt.getAttemptId().toString()
val historyAddress = ApplicationMaster
.getHistoryServerAddress(_sparkConf, yarnConf, appId, attemptId)

client.register(host, port, yarnConf, _sparkConf, uiAddress, historyAddress)
registered = true
}

YarnClient.register

1
2
3
4
5
6
7
8
9
10
11
12
13
14
15
16
17
18
19
20
21
22
def register(
driverHost: String,
driverPort: Int,
conf: YarnConfiguration,
sparkConf: SparkConf,
uiAddress: Option[String],
uiHistoryAddress: String): Unit = {
amClient = AMRMClient.createAMRMClient()
amClient.init(conf)
amClient.start()
this.uiHistoryAddress = uiHistoryAddress

val trackingUrl = uiAddress.getOrElse {
if (sparkConf.get(ALLOW_HISTORY_SERVER_TRACKING_URL)) uiHistoryAddress else ""
}

logInfo("Registering the ApplicationMaster")
synchronized {
amClient.registerApplicationMaster(driverHost, driverPort, trackingUrl)
registered = true
}
}

这一段都是和yarn相关的,就不展开了

12 createAllocator

1
2
3
4
5
6
7
8
9
10
11
12
13
14
15
16
17
18
19
20
21
22
23
24
25
26
27
28
29
30
31
32
33
34
35
36
37
38
39
40
41
42
43
44
45
46
47
48
private def createAllocator(
driverRef: RpcEndpointRef,
_sparkConf: SparkConf,
rpcEnv: RpcEnv,
appAttemptId: ApplicationAttemptId,
distCacheConf: SparkConf): Unit = {
.....
val appId = appAttemptId.getApplicationId().toString()
val driverUrl = RpcEndpointAddress(driverRef.address.host, driverRef.address.port,
CoarseGrainedSchedulerBackend.ENDPOINT_NAME).toString
val localResources = prepareLocalResources(distCacheConf)

// Before we initialize the allocator, let's log the information about how executors will
// be run up front, to avoid printing this out for every single executor being launched.
// Use placeholders for information that changes such as executor IDs.
logInfo {
val executorMemory = _sparkConf.get(EXECUTOR_MEMORY).toInt
val executorCores = _sparkConf.get(EXECUTOR_CORES)
val dummyRunner = new ExecutorRunnable(None, yarnConf, _sparkConf, driverUrl, "<executorId>",
"<hostname>", executorMemory, executorCores, appId, securityMgr, localResources,
ResourceProfile.DEFAULT_RESOURCE_PROFILE_ID)
dummyRunner.launchContextDebugInfo()
}

allocator = client.createAllocator(
yarnConf,
_sparkConf,
appAttemptId,
driverUrl,
driverRef,
securityMgr,
localResources)

// Initialize the AM endpoint *after* the allocator has been initialized. This ensures
// that when the driver sends an initial executor request (e.g. after an AM restart),
// the allocator is ready to service requests.
rpcEnv.setupEndpoint("YarnAM", new AMEndpoint(rpcEnv, driverRef))

allocator.allocateResources()
val ms = MetricsSystem.createMetricsSystem(MetricsSystemInstances.APPLICATION_MASTER, sparkConf)
val prefix = _sparkConf.get(YARN_METRICS_NAMESPACE).getOrElse(appId)
ms.registerSource(new ApplicationMasterSource(prefix, allocator))
// do not register static sources in this case as per SPARK-25277
ms.start(false)
metricsSystem = Some(ms)
reporterThread = launchReporterThread()
}

executor也启动完毕,这里也就不展开了。