写在前面 本节常见面试题 问题答案在文中都有提到
如何判断对象是否死亡(两种方法)。
简单的介绍一下强引用、软引用、弱引用、虚引用(虚引用与软引用和弱引用的区别、使用软引用能带来的好处)。
如何判断一个常量是废弃常量
如何判断一个类是无用的类
垃圾收集有哪些算法,各自的特点?
HotSpot 为什么要分为新生代和老年代?
常见的垃圾回收器有哪些?
介绍一下 CMS,G1 收集器。
Minor Gc 和 Full GC 有什么不同呢?
本文导火索
当需要排查各种内存溢出问题、当垃圾收集成为系统达到更高并发的瓶颈时,我们就需要对这些“自动化”的技术实施必要的监控和调节。
1 揭开 JVM 内存分配与回收的神秘面纱 Java 的自动内存管理主要是针对对象内存的回收和对象内存的分配。同时,Java 自动内存管理最核心的功能是 堆 内存中对象的分配与回收。
Java 堆是垃圾收集器管理的主要区域,因此也被称作GC 堆(Garbage Collected Heap) .从垃圾回收的角度,由于现在收集器基本都采用分代垃圾收集算法,所以 Java 堆还可以细分为:新生代和老年代:再细致一点有:Eden 空间、From Survivor、To Survivor 空间等。进一步划分的目的是更好地回收内存,或者更快地分配内存。
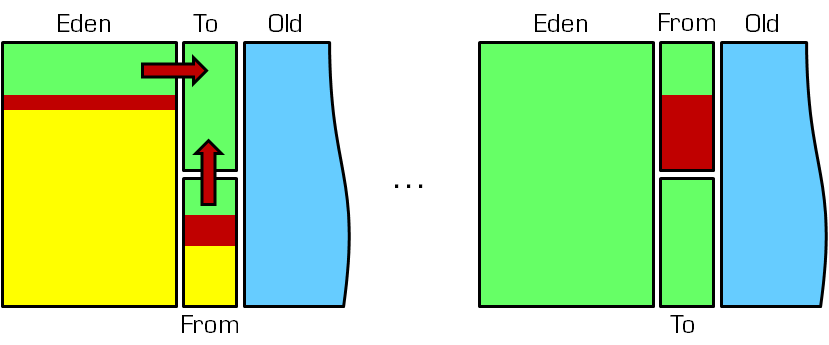
堆空间的基本结构:
上图所示的 Eden 区、From Survivor0(“From”) 区、To Survivor1(“To”) 区都属于新生代,Old Memory 区属于老年代。
大部分情况,对象都会首先在 Eden 区域分配,在一次新生代垃圾回收后,如果对象还存活,则会进入 s0 或者 s1,并且对象的年龄还会加 1(Eden 区->Survivor 区后对象的初始年龄变为 1),当它的年龄增加到一定程度(默认为大于 15 岁),就会被晋升到老年代中。对象晋升到老年代的年龄阈值,可以通过参数 -XX:MaxTenuringThreshold 来设置默认值,这个值会在虚拟机运行过程中进行调整,可以通过-XX:+PrintTenuringDistribution来打印出当次 GC 后的 Threshold。
🐛 修正(参见:issue552 ) :“Hotspot 遍历所有对象时,按照年龄从小到大对其所占用的大小进行累积,当累积的某个年龄大小超过了 survivor 区的一半时,取这个年龄和 MaxTenuringThreshold 中更小的一个值,作为新的晋升年龄阈值”。
动态年龄计算的代码如下
1 2 3 4 5 6 7 8 9 10 11 12 13 14 15 16 17 uint ageTable::compute_tenuring_threshold (size_t survivor_capacity) {size_t desired_survivor_size = (size_t )((((double )survivor_capacity)*TargetSurvivorRatio)/100 );size_t total = 0 ;uint age = 1 ; while (age < table_size) { total += sizes[age]; if (total > desired_survivor_size) { break ; } age++; } uint result = age < MaxTenuringThreshold ? age : MaxTenuringThreshold; ... }
经过这次 GC 后,Eden 区和”From”区已经被清空。这个时候,”From”和”To”会交换他们的角色,也就是新的”To”就是上次 GC 前的“From”,新的”From”就是上次 GC 前的”To”。不管怎样,都会保证名为 To 的 Survivor 区域是空的。Minor GC 会一直重复这样的过程,在这个过程中,有可能当次 Minor GC 后,Survivor 的”From”区域空间不够用,有一些还达不到进入老年代条件的实例放不下,则放不下的部分会提前进入老年代。
接下来我们提供一个调试脚本来测试这个过程。
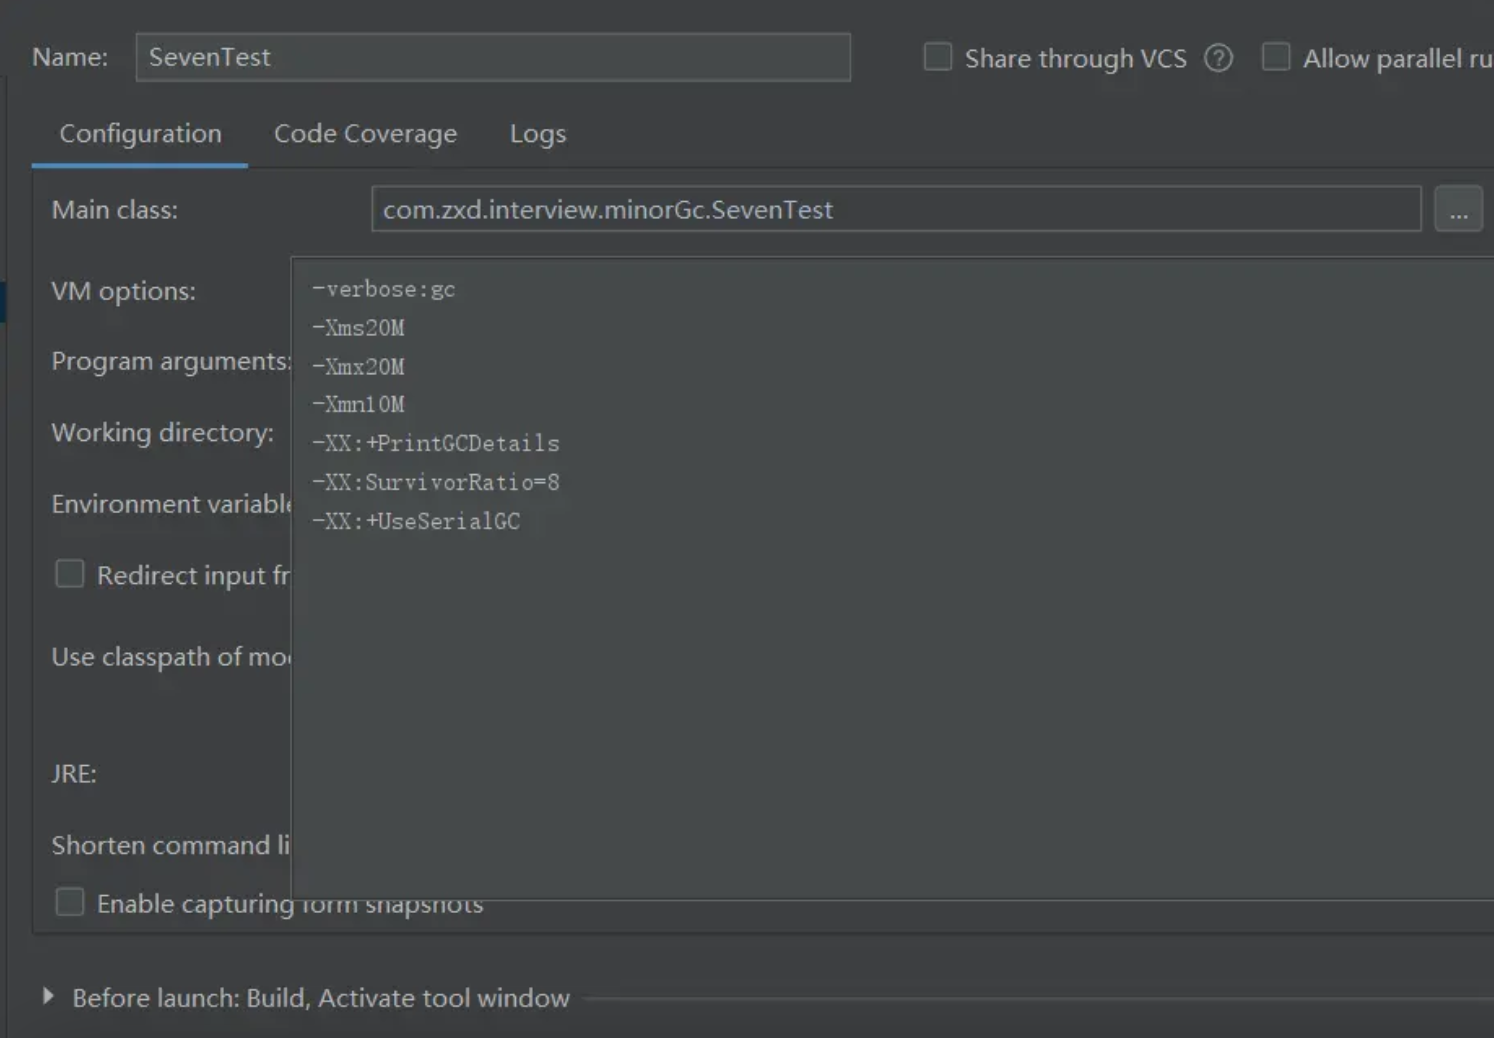
调试代码参数如下
1 2 3 4 5 6 7 8 9 10 11 -verbose: gc -Xmx200M -Xms200M -Xmn50M -XX :+PrintGCDetails -XX :TargetSurvivorRatio= 60 -XX :+PrintTenuringDistribution -XX :+PrintGCDateStamps -XX :MaxTenuringThreshold= 3 -XX :+UseConcMarkSweepGC -XX :+UseParNewGC
示例代码如下:
1 2 3 4 5 6 7 8 9 10 11 12 13 14 15 16 17 18 19 20 21 22 23 24 25 26 27 28 29 30 31 32 33 34 35 36 37 38 39 40 41 42 43 public class JavaGcTest { public static void main (String[] args) throws InterruptedException { byte [] byte1m_1 = new byte [1 * 1024 * 1024 ]; byte [] byte1m_2 = new byte [1 * 1024 * 1024 ]; byte [] byte1m_3 = new byte [1 * 1024 * 1024 ]; makeGarbage(34 ); byte [] byteArr = new byte [10 *1024 *1024 ]; makeGarbage(34 ); } private static void makeGarbage (int size) { byte [] byteArrTemp = new byte [size * 1024 * 1024 ]; } }
注意:如下输出结果中老年代的信息为 concurrent mark-sweep generation 和以前版本略有不同。另外,还列出了某次 GC 后是否重新生成了 threshold,以及各个年龄占用空间的大小。
1 2 3 4 5 6 7 8 9 10 11 12 13 14 15 2021-07-01T10:41:32.257+0800: [GC (Allocation Failure) 2021-07-01T10:41:32.257+0800: [ParNew Desired survivor size 3145728 bytes, new threshold 1 (max 3) - age 1: 3739264 bytes, 3739264 total : 40345K->3674K(46080K), 0.0014584 secs] 40345K->3674K(199680K), 0.0015063 secs] [Times: user=0.00 sys=0.00, real=0.00 secs] 2021-07-01T10:41:32.259+0800: [GC (Allocation Failure) 2021-07-01T10:41:32.259+0800: [ParNew Desired survivor size 3145728 bytes, new threshold 3 (max 3) : 13914K->0K(46080K), 0.0046596 secs] 13914K->13895K(199680K), 0.0046873 secs] [Times: user=0.00 sys=0.00, real=0.00 secs] Heap par new generation total 46080K, used 35225K [0x05000000, 0x08200000, 0x08200000) eden space 40960K, 86% used [0x05000000, 0x072667f0, 0x07800000) from space 5120K, 0% used [0x07800000, 0x07800000, 0x07d00000) to space 5120K, 0% used [0x07d00000, 0x07d00000, 0x08200000) concurrent mark-sweep generation total 153600K, used 13895K [0x08200000, 0x11800000, 0x11800000) Metaspace used 153K, capacity 2280K, committed 2368K, reserved 4480K
1.1 对象优先在 eden 区分配 目前主流的垃圾收集器都会采用分代回收算法,因此需要将堆内存分为新生代和老年代,这样我们就可以根据各个年代的特点选择合适的垃圾收集算法。
大多数情况下,对象在新生代中 eden 区分配。当 eden 区没有足够空间进行分配时,虚拟机将发起一次 Minor GC.下面我们来进行实际测试以下。
测试:
1 2 3 4 5 6 7 public class GCTest { public static void main (String[] args) { byte [] allocation1, allocation2; allocation1 = new byte [30900 *1024 ]; } }
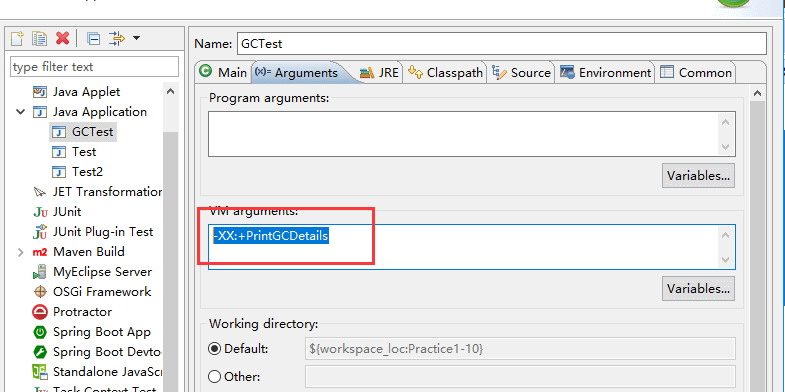
通过以下方式运行:
添加的参数:-XX:+PrintGCDetails
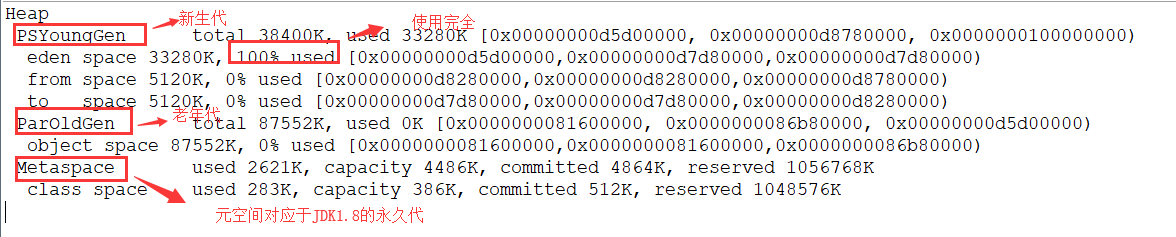
运行结果 (红色字体描述有误,应该是对应于 JDK1.7 的永久代):
从上图我们可以看出 eden 区内存几乎已经被分配完全(即使程序什么也不做,新生代也会使用 2000 多 k 内存)。假如我们再为 allocation2 分配内存会出现什么情况呢?
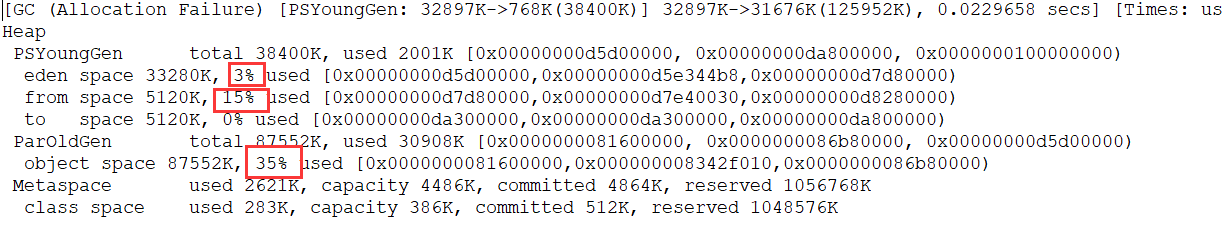
1 allocation2 = new byte [900 *1024 ];
简单解释一下为什么会出现这种情况: 因为给 allocation2 分配内存的时候 eden 区内存几乎已经被分配完了,我们刚刚讲了当 Eden 区没有足够空间进行分配时,虚拟机将发起一次 Minor GC.GC 期间虚拟机又发现 allocation1 无法存入 Survivor 空间,所以只好通过 分配担保机制 把新生代的对象提前转移到老年代中去,老年代上的空间足够存放 allocation1,所以不会出现 Full GC。执行 Minor GC 后,后面分配的对象如果能够存在 eden 区的话,还是会在 eden 区分配内存。可以执行如下代码验证:
1 2 3 4 5 6 7 8 9 10 11 12 public class GCTest { public static void main (String[] args) { byte [] allocation1, allocation2,allocation3,allocation4,allocation5; allocation1 = new byte [32000 *1024 ]; allocation2 = new byte [1000 *1024 ]; allocation3 = new byte [1000 *1024 ]; allocation4 = new byte [1000 *1024 ]; allocation5 = new byte [1000 *1024 ]; } }
1.2 大对象直接进入老年代 大对象就是需要大量连续内存空间的对象(比如:字符串、数组)。
为什么要这样呢?
为了避免为大对象分配内存时由于分配担保机制带来的复制而降低效率。
1.3 长期存活的对象将进入老年代 既然虚拟机采用了分代收集的思想来管理内存,那么内存回收时就必须能识别哪些对象应放在新生代,哪些对象应放在老年代中。为了做到这一点,虚拟机给每个对象一个对象年龄(Age)计数器。
如果对象在 Eden 出生并经过第一次 Minor GC 后仍然能够存活,并且能被 Survivor 容纳的话,将被移动到 Survivor 空间中,并将对象年龄设为 1.对象在 Survivor 中每熬过一次 MinorGC,年龄就增加 1 岁,当它的年龄增加到一定程度(默认为 15 岁),就会被晋升到老年代中。对象晋升到老年代的年龄阈值,可以通过参数 -XX:MaxTenuringThreshold 来设置。
1.4 动态对象年龄判定 大部分情况,对象都会首先在 Eden 区域分配,在一次新生代垃圾回收后,如果对象还存活,则会进入 s0 或者 s1,并且对象的年龄还会加 1(Eden 区->Survivor 区后对象的初始年龄变为 1),当它的年龄增加到一定程度(默认为 15 岁),就会被晋升到老年代中。对象晋升到老年代的年龄阈值,可以通过参数 -XX:MaxTenuringThreshold 来设置。
修正(issue552 ):“Hotspot 遍历所有对象时,按照年龄从小到大对其所占用的大小进行累积,当累积的某个年龄大小超过了 survivor 区的 50% 时(默认值是 50%,可以通过 -XX:TargetSurvivorRatio=percent 来设置,参见 issue1199 ),取这个年龄和 MaxTenuringThreshold 中更小的一个值,作为新的晋升年龄阈值”。
jdk8 官方文档引用 :https://docs.oracle.com/javase/8/docs/technotes/tools/unix/java.html 。
动态年龄计算的代码如下:
1 2 3 4 5 6 7 8 9 10 11 12 13 14 15 16 17 uint ageTable::compute_tenuring_threshold (size_t survivor_capacity) {size_t desired_survivor_size = (size_t )((((double )survivor_capacity)*TargetSurvivorRatio)/100 );size_t total = 0 ;uint age = 1 ; while (age < table_size) {total += sizes[age]; if (total > desired_survivor_size) { break ; } age++; } uint result = age < MaxTenuringThreshold ? age : MaxTenuringThreshold; ... }
额外补充说明(issue672 ):关于默认的晋升年龄是 15,这个说法的来源大部分都是《深入理解 Java 虚拟机》这本书。 相关的虚拟机参数 ,你会发现-XX:MaxTenuringThreshold=threshold这里有个说明
Sets the maximum tenuring threshold for use in adaptive GC sizing. The largest value is 15. The default value is 15 for the parallel (throughput) collector, and 6 for the CMS collector.默认晋升年龄并不都是 15,这个是要区分垃圾收集器的,CMS 就是 6.
1.5 主要进行 gc 的区域 周志明先生在《深入理解 Java 虚拟机》第二版中 P92 如是写道:
“老年代 GC(Major GC/Full GC),指发生在老年代的 GC……”
上面的说法已经在《深入理解 Java 虚拟机》第三版中被改正过来了。感谢 R 大的回答:
总结:
针对 HotSpot VM 的实现,它里面的 GC 其实准确分类只有两大种:
部分收集 (Partial GC):
新生代收集(Minor GC / Young GC):只对新生代进行垃圾收集;
老年代收集(Major GC / Old GC):只对老年代进行垃圾收集。需要注意的是 Major GC 在有的语境中也用于指代整堆收集;
混合收集(Mixed GC):对整个新生代和部分老年代进行垃圾收集。
整堆收集 (Full GC):收集整个 Java 堆和方法区。
1.6 空间分配担保 空间分配担保是为了确保在 Minor GC 之前老年代本身还有容纳新生代所有对象的剩余空间。
《深入理解 Java 虚拟机》第三章对于空间分配担保的描述如下:
JDK 6 Update 24 之前,在发生 Minor GC 之前,虚拟机必须先检查老年代最大可用的连续空间是否大于新生代所有对象总空间,如果这个条件成立,那这一次 Minor GC 可以确保是安全的。如果不成立,则虚拟机会先查看 -XX:HandlePromotionFailure 参数的设置值是否允许担保失败(Handle Promotion Failure);如果允许,那会继续检查老年代最大可用的连续空间是否大于历次晋升到老年代对象的平均大小,如果大于,将尝试进行一次 Minor GC,尽管这次 Minor GC 是有风险的;如果小于,或者 -XX: HandlePromotionFailure 设置不允许冒险,那这时就要改为进行一次 Full GC。
JDK 6 Update 24 之后的规则变为只要老年代的连续空间大于新生代对象总大小或者历次晋升的平均大小,就会进行 Minor GC,否则将进行 Full GC。
2 对象已经死亡? 堆中几乎放着所有的对象实例,对堆垃圾回收前的第一步就是要判断哪些对象已经死亡(即不能再被任何途径使用的对象)。
2.1 引用计数法 给对象中添加一个引用计数器,每当有一个地方引用它,计数器就加 1;当引用失效,计数器就减 1;任何时候计数器为 0 的对象就是不可能再被使用的。
这个方法实现简单,效率高,但是目前主流的虚拟机中并没有选择这个算法来管理内存,其最主要的原因是它很难解决对象之间相互循环引用的问题。 所谓对象之间的相互引用问题,如下面代码所示:除了对象 objA 和 objB 相互引用着对方之外,这两个对象之间再无任何引用。但是他们因为互相引用对方,导致它们的引用计数器都不为 0,于是引用计数算法无法通知 GC 回收器回收他们。
1 2 3 4 5 6 7 8 9 10 11 12 public class ReferenceCountingGc { Object instance = null ; public static void main (String[] args) { ReferenceCountingGc objA = new ReferenceCountingGc (); ReferenceCountingGc objB = new ReferenceCountingGc (); objA.instance = objB; objB.instance = objA; objA = null ; objB = null ; } }
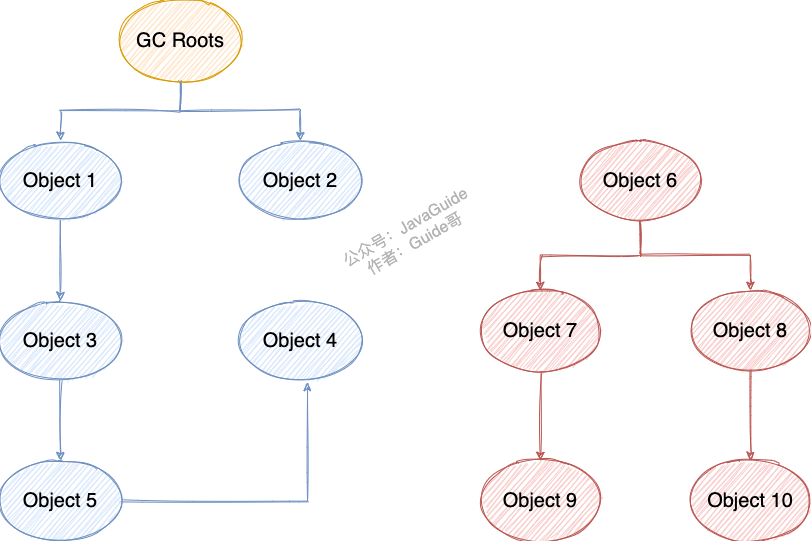
2.2 可达性分析算法 这个算法的基本思想就是通过一系列的称为 “GC Roots” 的对象作为起点,从这些节点开始向下搜索,节点所走过的路径称为引用链,当一个对象到 GC Roots 没有任何引用链相连的话,则证明此对象是不可用的,需要被回收。
下图中的 Object 6 ~ Object 10 之间虽有引用关系,但它们到 GC Roots 不可达,因此为需要被回收的对象。
哪些对象可以作为 GC Roots 呢?
虚拟机栈(栈帧中的本地变量表)中引用的对象
本地方法栈(Native 方法)中引用的对象
方法区中类静态属性引用的对象
方法区中常量引用的对象
所有被同步锁持有的对象
对象可以被回收,就代表一定会被回收吗?
即使在可达性分析法中不可达的对象,也并非是“非死不可”的,这时候它们暂时处于“缓刑阶段”,要真正宣告一个对象死亡,至少要经历两次标记过程;可达性分析法中不可达的对象被第一次标记并且进行一次筛选,筛选的条件是此对象是否有必要执行 finalize 方法。当对象没有覆盖 finalize 方法,或 finalize 方法已经被虚拟机调用过时,虚拟机将这两种情况视为没有必要执行。
被判定为需要执行的对象将会被放在一个队列中进行第二次标记,除非这个对象与引用链上的任何一个对象建立关联,否则就会被真的回收。
Object 类中的 finalize 方法一直被认为是一个糟糕的设计,成为了 Java 语言的负担,影响了 Java 语言的安全和 GC 的性能。JDK9 版本及后续版本中各个类中的 finalize 方法会被逐渐弃用移除。忘掉它的存在吧!
参考:
2.3 再谈引用 无论是通过引用计数法判断对象引用数量,还是通过可达性分析法判断对象的引用链是否可达,判定对象的存活都与“引用”有关。
JDK1.2 之前,Java 中引用的定义很传统:如果 reference 类型的数据存储的数值代表的是另一块内存的起始地址,就称这块内存代表一个引用。
JDK1.2 以后,Java 对引用的概念进行了扩充,将引用分为强引用、软引用、弱引用、虚引用四种(引用强度逐渐减弱)
1.强引用(StrongReference)
以前我们使用的大部分引用实际上都是强引用,这是使用最普遍的引用。如果一个对象具有强引用,那就类似于必不可少的生活用品 ,垃圾回收器绝不会回收它。当内存空间不足,Java 虚拟机宁愿抛出 OutOfMemoryError 错误,使程序异常终止,也不会靠随意回收具有强引用的对象来解决内存不足问题。
2.软引用(SoftReference)
如果一个对象只具有软引用,那就类似于可有可无的生活用品 。如果内存空间足够,垃圾回收器就不会回收它,如果内存空间不足了,就会回收这些对象的内存。只要垃圾回收器没有回收它,该对象就可以被程序使用。软引用可用来实现内存敏感的高速缓存。
软引用可以和一个引用队列(ReferenceQueue)联合使用,如果软引用所引用的对象被垃圾回收,JAVA 虚拟机就会把这个软引用加入到与之关联的引用队列中。
3.弱引用(WeakReference)
如果一个对象只具有弱引用,那就类似于可有可无的生活用品 。弱引用与软引用的区别在于:只具有弱引用的对象拥有更短暂的生命周期。在垃圾回收器线程扫描它所管辖的内存区域的过程中,一旦发现了只具有弱引用的对象,不管当前内存空间足够与否,都会回收它的内存。不过,由于垃圾回收器是一个优先级很低的线程, 因此不一定会很快发现那些只具有弱引用的对象。
弱引用可以和一个引用队列(ReferenceQueue)联合使用,如果弱引用所引用的对象被垃圾回收,Java 虚拟机就会把这个弱引用加入到与之关联的引用队列中。
4.虚引用(PhantomReference)
“虚引用”顾名思义,就是形同虚设,与其他几种引用都不同,虚引用并不会决定对象的生命周期。如果一个对象仅持有虚引用,那么它就和没有任何引用一样,在任何时候都可能被垃圾回收。
虚引用主要用来跟踪对象被垃圾回收的活动 。
虚引用与软引用和弱引用的一个区别在于: 虚引用必须和引用队列(ReferenceQueue)联合使用。当垃圾回收器准备回收一个对象时,如果发现它还有虚引用,就会在回收对象的内存之前,把这个虚引用加入到与之关联的引用队列中。程序可以通过判断引用队列中是否已经加入了虚引用,来了解被引用的对象是否将要被垃圾回收。程序如果发现某个虚引用已经被加入到引用队列,那么就可以在所引用的对象的内存被回收之前采取必要的行动。
特别注意,在程序设计中一般很少使用弱引用与虚引用,使用软引用的情况较多,这是因为软引用可以加速 JVM 对垃圾内存的回收速度,可以维护系统的运行安全,防止内存溢出(OutOfMemory)等问题的产生 。
2.5 如何判断一个常量是废弃常量? 运行时常量池主要回收的是废弃的常量。那么,我们如何判断一个常量是废弃常量呢?
JDK1.7 及之后版本的 JVM 已经将运行时常量池从方法区中移了出来,在 Java 堆(Heap)中开辟了一块区域存放运行时常量池。
🐛 修正(参见:issue747 ,reference ) :
JDK1.7 之前运行时常量池逻辑包含字符串常量池存放在方法区, 此时 hotspot 虚拟机对方法区的实现为永久代 JDK1.7 字符串常量池被从方法区拿到了堆中, 这里没有提到运行时常量池,也就是说字符串常量池被单独拿到堆,运行时常量池剩下的东西还在方法区, 也就是 hotspot 中的永久代 。JDK1.8 hotspot 移除了永久代用元空间(Metaspace)取而代之, 这时候字符串常量池还在堆, 运行时常量池还在方法区, 只不过方法区的实现从永久代变成了元空间(Metaspace)
假如在字符串常量池中存在字符串 “abc”,如果当前没有任何 String 对象引用该字符串常量的话,就说明常量 “abc” 就是废弃常量,如果这时发生内存回收的话而且有必要的话,”abc” 就会被系统清理出常量池了。
2.6 如何判断一个类是无用的类 方法区主要回收的是无用的类,那么如何判断一个类是无用的类的呢?
判定一个常量是否是“废弃常量”比较简单,而要判定一个类是否是“无用的类”的条件则相对苛刻许多。类需要同时满足下面 3 个条件才能算是 “无用的类” :
该类所有的实例都已经被回收,也就是 Java 堆中不存在该类的任何实例。
加载该类的 ClassLoader 已经被回收。
该类对应的 java.lang.Class 对象没有在任何地方被引用,无法在任何地方通过反射访问该类的方法。
虚拟机可以对满足上述 3 个条件的无用类进行回收,这里说的仅仅是“可以”,而并不是和对象一样不使用了就会必然被回收。
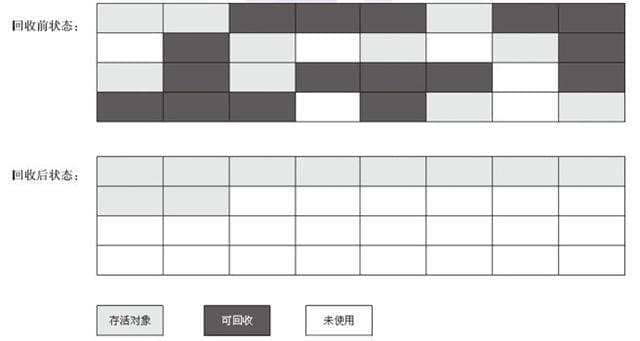
3 垃圾收集算法 3.1 标记-清除算法 该算法分为“标记”和“清除”阶段:首先标记出所有不需要回收的对象,在标记完成后统一回收掉所有没有被标记的对象。它是最基础的收集算法,后续的算法都是对其不足进行改进得到。这种垃圾收集算法会带来两个明显的问题:
效率问题 空间问题(标记清除后会产生大量不连续的碎片)
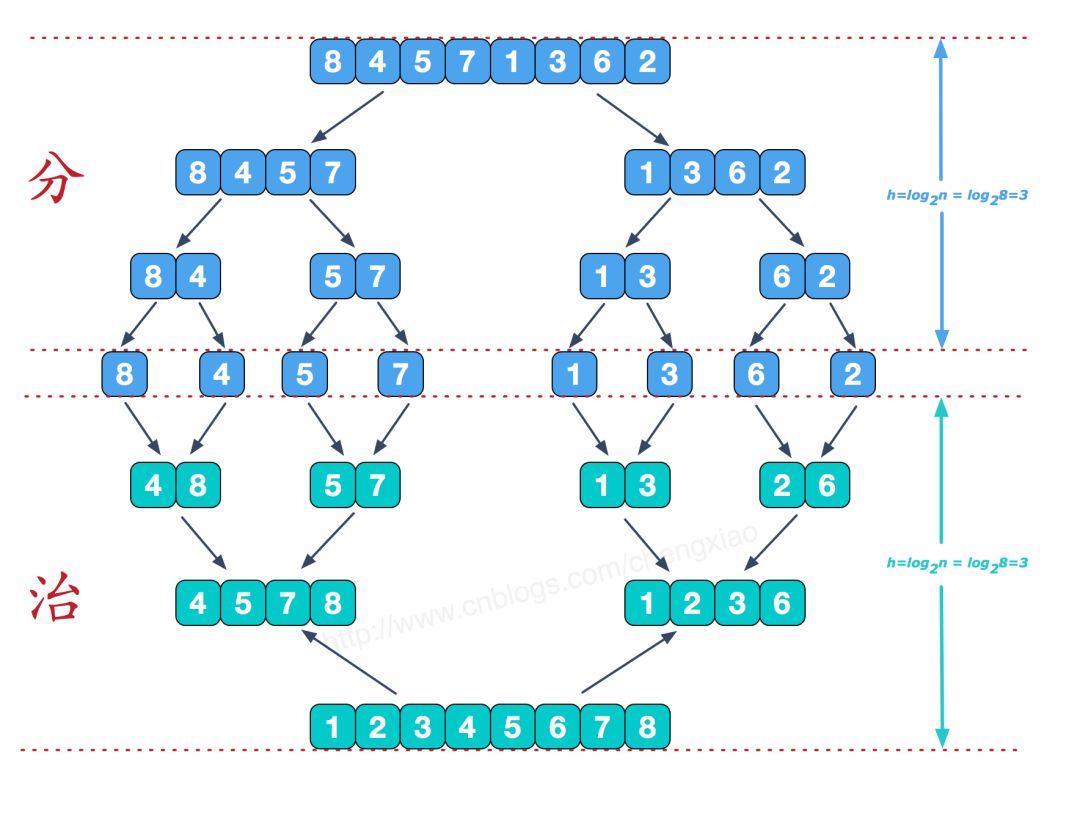
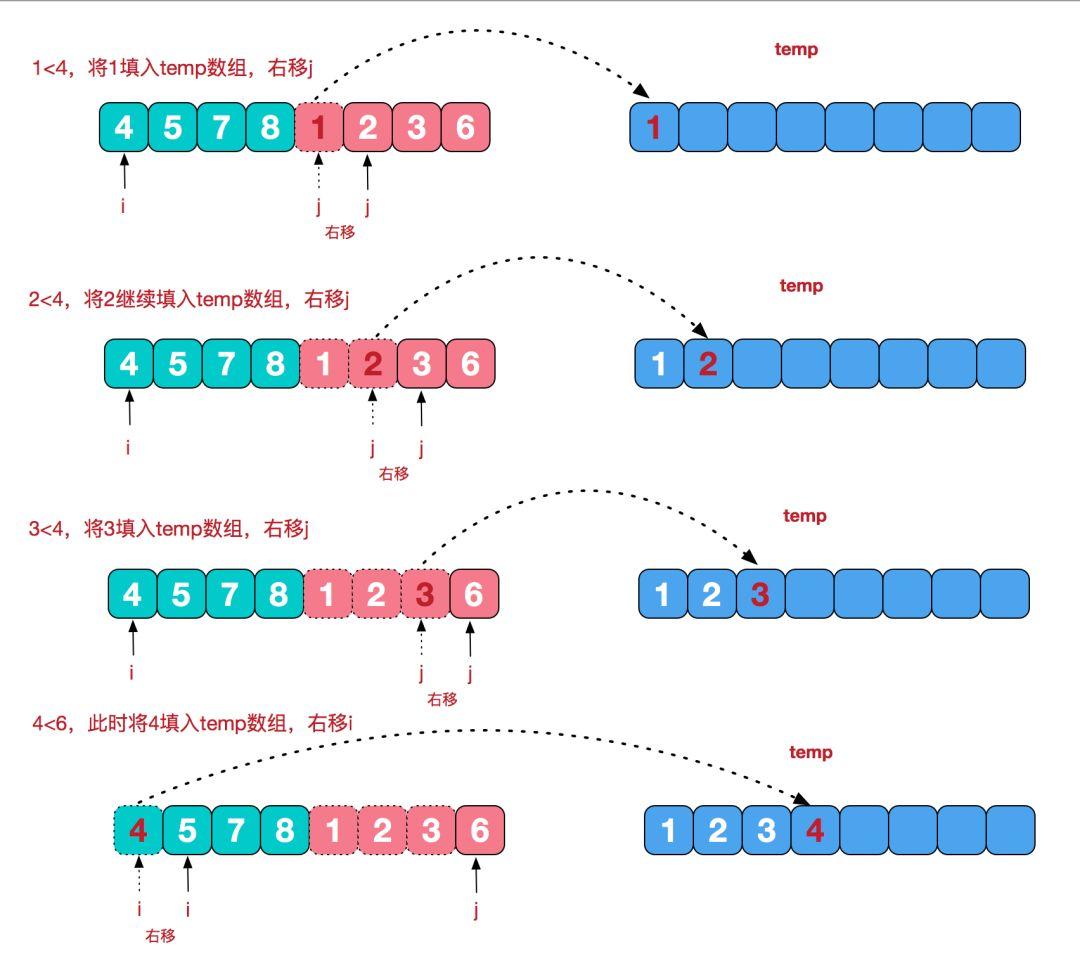
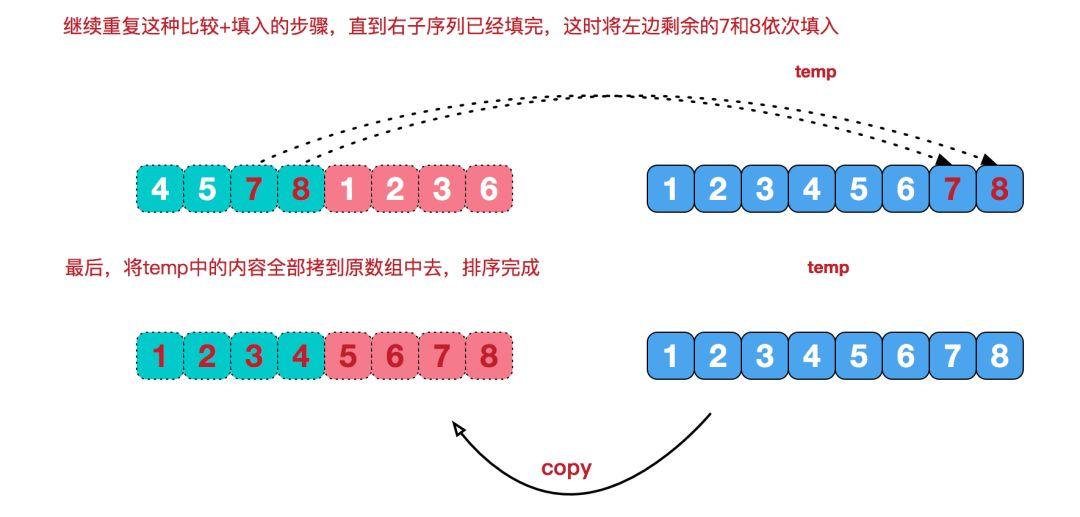
3.2 标记-复制算法 为了解决效率问题,“标记-复制”收集算法出现了。它可以将内存分为大小相同的两块,每次使用其中的一块。当这一块的内存使用完后,就将还存活的对象复制到另一块去,然后再把使用的空间一次清理掉。这样就使每次的内存回收都是对内存区间的一半进行回收。
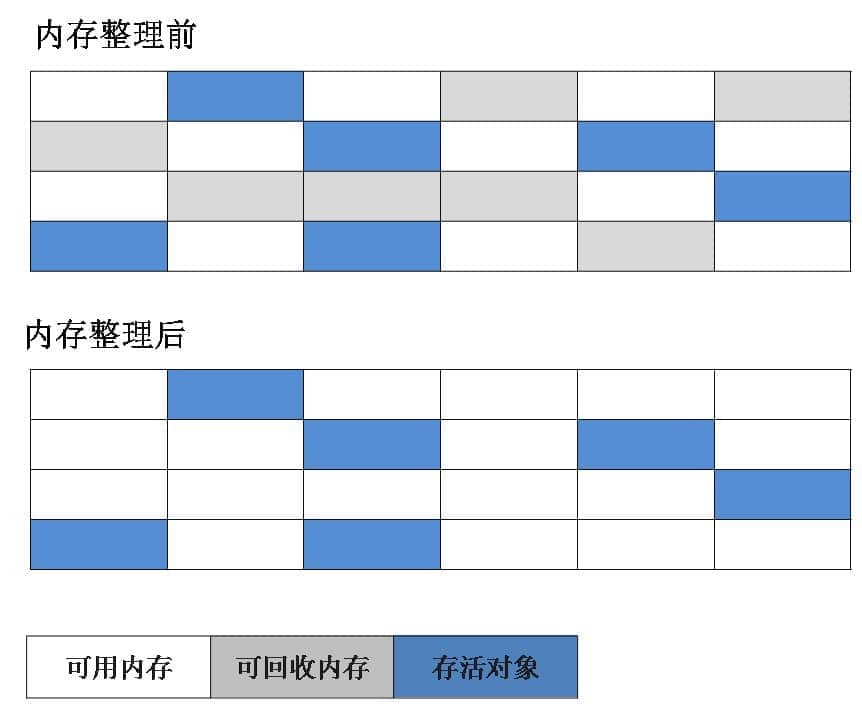
3.3 标记-整理算法 根据老年代的特点提出的一种标记算法,标记过程仍然与“标记-清除”算法一样,但后续步骤不是直接对可回收对象回收,而是让所有存活的对象向一端移动,然后直接清理掉端边界以外的内存。
3.4 分代收集算法 当前虚拟机的垃圾收集都采用分代收集算法,这种算法没有什么新的思想,只是根据对象存活周期的不同将内存分为几块。一般将 java 堆分为新生代和老年代,这样我们就可以根据各个年代的特点选择合适的垃圾收集算法。
比如在新生代中,每次收集都会有大量对象死去,所以可以选择”标记-复制“算法,只需要付出少量对象的复制成本就可以完成每次垃圾收集。而老年代的对象存活几率是比较高的,而且没有额外的空间对它进行分配担保,所以我们必须选择“标记-清除”或“标记-整理”算法进行垃圾收集。
延伸面试问题: HotSpot 为什么要分为新生代和老年代?
根据上面的对分代收集算法的介绍回答。
4 垃圾收集器 如果说收集算法是内存回收的方法论,那么垃圾收集器就是内存回收的具体实现。
虽然我们对各个收集器进行比较,但并非要挑选出一个最好的收集器。因为直到现在为止还没有最好的垃圾收集器出现,更加没有万能的垃圾收集器,我们能做的就是根据具体应用场景选择适合自己的垃圾收集器 。试想一下:如果有一种四海之内、任何场景下都适用的完美收集器存在,那么我们的 HotSpot 虚拟机就不会实现那么多不同的垃圾收集器了。
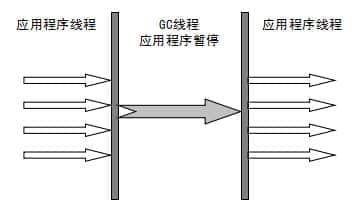
4.1 Serial 收集器 Serial(串行)收集器是最基本、历史最悠久的垃圾收集器了。大家看名字就知道这个收集器是一个单线程收集器了。它的 “单线程” 的意义不仅仅意味着它只会使用一条垃圾收集线程去完成垃圾收集工作,更重要的是它在进行垃圾收集工作的时候必须暂停其他所有的工作线程( “Stop The World” ),直到它收集结束。
新生代采用标记-复制算法,老年代采用标记-整理算法。
虚拟机的设计者们当然知道 Stop The World 带来的不良用户体验,所以在后续的垃圾收集器设计中停顿时间在不断缩短(仍然还有停顿,寻找最优秀的垃圾收集器的过程仍然在继续)。
但是 Serial 收集器有没有优于其他垃圾收集器的地方呢?当然有,它简单而高效(与其他收集器的单线程相比) 。Serial 收集器由于没有线程交互的开销,自然可以获得很高的单线程收集效率。Serial 收集器对于运行在 Client 模式下的虚拟机来说是个不错的选择。
4.2 ParNew 收集器 ParNew 收集器其实就是 Serial 收集器的多线程版本,除了使用多线程进行垃圾收集外,其余行为(控制参数、收集算法、回收策略等等)和 Serial 收集器完全一样。
新生代采用标记-复制算法,老年代采用标记-整理算法。
它是许多运行在 Server 模式下的虚拟机的首要选择,除了 Serial 收集器外,只有它能与 CMS 收集器(真正意义上的并发收集器,后面会介绍到)配合工作。
并行和并发概念补充:
4.3 Parallel Scavenge 收集器 Parallel Scavenge 收集器也是使用标记-复制算法的多线程收集器,它看上去几乎和 ParNew 都一样。 那么它有什么特别之处呢?
1 2 3 4 5 6 7 8 -XX :+UseParallelGC 使用 Parallel 收集器+ 老年代串行 -XX :+UseParallelOldGC 使用 Parallel 收集器+ 老年代并行
Parallel Scavenge 收集器关注点是吞吐量(高效率的利用 CPU)。CMS 等垃圾收集器的关注点更多的是用户线程的停顿时间(提高用户体验)。所谓吞吐量就是 CPU 中用于运行用户代码的时间与 CPU 总消耗时间的比值。 Parallel Scavenge 收集器提供了很多参数供用户找到最合适的停顿时间或最大吞吐量,如果对于收集器运作不太了解,手工优化存在困难的时候,使用 Parallel Scavenge 收集器配合自适应调节策略,把内存管理优化交给虚拟机去完成也是一个不错的选择。
新生代采用标记-复制算法,老年代采用标记-整理算法。
这是 JDK1.8 默认收集器
使用 java -XX:+PrintCommandLineFlags -version 命令查看
1 2 3 4 -XX :InitialHeapSize= 262921408 -XX :MaxHeapSize= 4206742528 -XX :+PrintCommandLineFlags -XX :+UseCompressedClassPointers -XX :+UseCompressedOops -XX :+UseParallelGC java version "1.8.0_211" Java(TM ) SE Runtime Environment (build 1.8 .0_211 -b12) Java HotSpot(TM ) 64 -Bit Server VM (build 25.211 -b12, mixed mode)
JDK1.8 默认使用的是 Parallel Scavenge + Parallel Old,如果指定了-XX:+UseParallelGC 参数,则默认指定了-XX:+UseParallelOldGC,可以使用-XX:-UseParallelOldGC 来禁用该功能
4.4.Serial Old 收集器 Serial 收集器的老年代版本 ,它同样是一个单线程收集器。它主要有两大用途:一种用途是在 JDK1.5 以及以前的版本中与 Parallel Scavenge 收集器搭配使用,另一种用途是作为 CMS 收集器的后备方案。
4.5 Parallel Old 收集器 Parallel Scavenge 收集器的老年代版本 。使用多线程和“标记-整理”算法。在注重吞吐量以及 CPU 资源的场合,都可以优先考虑 Parallel Scavenge 收集器和 Parallel Old 收集器。
4.6 CMS 收集器 CMS(Concurrent Mark Sweep)收集器是一种以获取最短回收停顿时间为目标的收集器。它非常符合在注重用户体验的应用上使用。
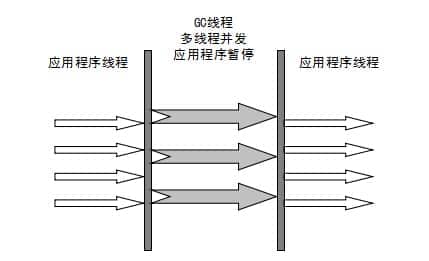
CMS(Concurrent Mark Sweep)收集器是 HotSpot 虚拟机第一款真正意义上的并发收集器,它第一次实现了让垃圾收集线程与用户线程(基本上)同时工作。
从名字中的Mark Sweep 这两个词可以看出,CMS 收集器是一种 “标记-清除”算法 实现的,它的运作过程相比于前面几种垃圾收集器来说更加复杂一些。整个过程分为四个步骤:
初始标记: 暂停所有的其他线程,并记录下直接与 root 相连的对象,速度很快 ;并发标记: 同时开启 GC 和用户线程,用一个闭包结构去记录可达对象。但在这个阶段结束,这个闭包结构并不能保证包含当前所有的可达对象。因为用户线程可能会不断的更新引用域,所以 GC 线程无法保证可达性分析的实时性。所以这个算法里会跟踪记录这些发生引用更新的地方。重新标记: 重新标记阶段就是为了修正并发标记期间因为用户程序继续运行而导致标记产生变动的那一部分对象的标记记录,这个阶段的停顿时间一般会比初始标记阶段的时间稍长,远远比并发标记阶段时间短并发清除: 开启用户线程,同时 GC 线程开始对未标记的区域做清扫。
从它的名字就可以看出它是一款优秀的垃圾收集器,主要优点:并发收集、低停顿 。但是它有下面三个明显的缺点:
对 CPU 资源敏感; 无法处理浮动垃圾; 它使用的回收算法-“标记-清除”算法会导致收集结束时会有大量空间碎片产生。
4.7 G1 收集器 G1 (Garbage-First) 是一款面向服务器的垃圾收集器,主要针对配备多颗处理器及大容量内存的机器. 以极高概率满足 GC 停顿时间要求的同时,还具备高吞吐量性能特征.
被视为 JDK1.7 中 HotSpot 虚拟机的一个重要进化特征。它具备以下特点:
并行与并发 :G1 能充分利用 CPU、多核环境下的硬件优势,使用多个 CPU(CPU 或者 CPU 核心)来缩短 Stop-The-World 停顿时间。部分其他收集器原本需要停顿 Java 线程执行的 GC 动作,G1 收集器仍然可以通过并发的方式让 java 程序继续执行。分代收集 :虽然 G1 可以不需要其他收集器配合就能独立管理整个 GC 堆,但是还是保留了分代的概念。空间整合 :与 CMS 的“标记-清理”算法不同,G1 从整体来看是基于“标记-整理”算法实现的收集器;从局部上来看是基于“标记-复制”算法实现的。可预测的停顿 :这是 G1 相对于 CMS 的另一个大优势,降低停顿时间是 G1 和 CMS 共同的关注点,但 G1 除了追求低停顿外,还能建立可预测的停顿时间模型,能让使用者明确指定在一个长度为 M 毫秒的时间片段内。
G1 收集器的运作大致分为以下几个步骤:
G1 收集器在后台维护了一个优先列表,每次根据允许的收集时间,优先选择回收价值最大的 Region(这也就是它的名字 Garbage-First 的由来) 。这种使用 Region 划分内存空间以及有优先级的区域回收方式,保证了 G1 收集器在有限时间内可以尽可能高的收集效率(把内存化整为零)。
4.8 ZGC 收集器 与 CMS 中的 ParNew 和 G1 类似,ZGC 也采用标记-复制算法,不过 ZGC 对该算法做了重大改进。
在 ZGC 中出现 Stop The World 的情况会更少!
详情可以看 : 《新一代垃圾回收器 ZGC 的探索与实践》
参考